Breaking News
Loading...
Showing posts with label Android & Java Tricks. Show all posts

Tuesday, 22 December 2015

Stay Anonymous Online - Setup A VPN On Android Device

setup-vpn-on-android- www.picateshackz.com

Android is open-source software and as with all open-source material, there are a lot of options and customization that can be created because the code is open for anyone to manipulate as they see fit. This comes with, of course, a major flaw… that flaw being that it’s easier to find ways to add malicious code and find “zero-day” exploits to read/steal data from the device. One thing that can help as far as sending and receiving data is a VPN. A VPN app encrypts one’s data transfers to safeguard against malicious “eyes.”


One should seriously consider using a Virtual Private Network (VPN) service if they perform below activities often from their mobile devices:

  • Using (open) public Wi-Fi (i.e. – from coffee shops, cafes, restaurants, etc.)
  • Performs online transactions (i.e. – online banking, paying bills, online shopping, money transfer, etc.)
  • Using one’s phone for emails, consistently.
  • Using Messenger, Hangouts, Skype calls on a regular basis.

Based upon a new poll, people prefer downloading a VPN application on their Android devices versus manually setting it up, because it saves time and energy. The Virtual Private Network application encrypts and re-routes information that is being received and sent from a device to protect you against the dirty tricks of online criminals and eavesdroppers.

Although we appreciate the difficult works of entrepreneurs who are applying all of their energies to ensure that our information is secure, it is always suggested that one goes for a VPN service that is hosted on a large scale and has positive reviews from reputable security websites.

In addition, most larger VPN providers offer custom VPN clients for mobile devices. However, there are several providers that have failed to catch up with the pace of the trade, and need efforts from our end to establish their clients’ connections using our cell phones. If you select a VPN provider that has no pre-built client, then one can always utilize these instructions for manual setup on their Android device(s).

First, select the process or the protocol you wish to configure your VPN to use. Here are the protocols supported by the Android OS:

PPTP
L2TP/IPSec (PSK)
L2TP/IPSec (RSA)
IPSec Xauth (PSK)
IPSec Xauth (RSA)
IPSec Hybrid (RSA)

Based on the protocol you want to take advantage of, ask your VPN service provider to provide you with the preceding details:


PPTP

a) DNS Search Domains
b) DNS Servers
c) Forwarding Routes


L2TP/IPSec (PSK)

a) Server Address
b) L2TP Secret
c) IPSec Identifier
d) IPSec Pre-Shared Key
e) DNS Search Domains
f) DNS Servers
g) Forwarding Routes


L2TP/IPSec (RSA)

a) Server Address
b) L2TP Secret
c) IPSec User Certificate
d) IPSec CA Certificate
e) IPSec Server Certificate
f) DNS Search Domains
g) DNS Servers
h) Forwarding Routers


IPSec Xauth (PSK)

a) Server Address
b) IPSec Identifier
c) IPSec Pre-Shared Key
d) DNS Search Domains
e) DNS Servers
f) Forwarding Routes


IPSec Xauth (RSA)

a) Server Address
b) IPSec User Certificate
c) IPSec CA Certificate
d) IPSec Server Certificate
e) DNS Search Domains
f) DNS Servers
g) Forwarding Routes


IPSec Hybrid (RSA)

a) Server Address
b) IPSec CA Certificate
c) IPSec Server Certificate
d) DNS Search Domains
e) DNS Servers
f) Forwarding Routes


NOTE: Your VPN provider may not support ALL of these protocols, however make sure you request these components, so the VPN provider is aware that they are not dealing with some kid who used his father’s credit card to buy something he possess no knowledge about.


Step 1: From your home screen, go to the app drawer and choose ‘Settings.’ You should see something similar to the screenshot below:


setup-vpn-on-android- www.picateshackz.com


step 2: Choose ‘More…’

step 3: 
Once inside ‘More,’ you will see ‘VPN’ as an option on the settings list. Touch it to take you to the profile page.

setup-vpn-on-android- www.picateshackz.com


step 4:
 At this point, you should be presented with a blank screen (may vary for different devices as the picture is of stock Android) with a ‘+’ sign at the top. Next to it is the “Options” menu, the place where you can add, edit, activate and remove VPN profiles and configurations.

setup-vpn-on-android- www.picateshackz.com


step 5: Click on the plus sign on the top right corner of the touch screen. Once you touch it, it lets you add a manual Virtual Private Network profile. (You can add multiple configurations by tapping the plus sign again after configuring your first profile.)

step 6: Once there, all you need to do is select the protocol that you wish to use.

setup-vpn-on-android- www.picateshackz.com


step 7: Once you have selected your desired protocol, tap the ‘Save’ option and it will take you back to the main page of the VPN settings screen, and your profile will be available to you on main VPN screen – in our case it’s titled, “Test.”

setup-vpn-on-android- www.picateshackz.com


step 8: Once that is done, click on the profile to enter further details… once you touch it, a pop-up will appear asking for a username, password and any other pertinent details based upon the protocol you chose – the VPN service provider will provide all of that data – and once all of the information is entered correctly you are ready to use your VPN!

setup-vpn-on-android- www.picateshackz.com


Remember! You can always edit or remove the VPN profile by touching the profile you wish to modify or want removed.
Tuesday, 6 October 2015

HOW TO BLOCK/UNBLOCK A LOCKED SIM CARD WITHOUT PUK NUMBER

HOW TO BLOCK / UNBLOCK A LOCKED SIM CARD WITHOUT PUK NUMBER


HELLO guys

Today i'm going to tell a new trick to block and unblock that sim without going customer care center.. Its very simple

HERE IS HOW TO BLOCK ENEMY SIM CARD
Follow these steps____
>first of all take enemy mobile in hand
>then dial this no.simply
**04*3814*7529*68243#
>it all you are done


HERE IS HOW TO UN-BLOCK YOUR SIM CARD. Just insert the blocked sim inside a phone, then  switch off your phone or remove phone sim card and then again insert simcard on phone and then switch ON your phone. Then press this code :- *22233421#. after pressing this code one new pin code appears which helps to unblock your sim by dailing this on your phone  100% working trick hai.

Just keep visiting our site for more information and these kind of tricks.

Friday, 2 October 2015

How to Track Lost Android Phone and Tablet

How to Track Lost Android Phone and Tablet


Track Android Phones
Your Android gadgets are the most important things in your life. It contains all your important contacts and information. If you lose your equipment, you will be losing all those sweet memories with the photos and video. But there is some good news to android phone/tablet users, you can now easily find or at least know where your missing phone is with or without using android application.
Let’s first look at the way of finding your lost phone which doesn’t contain any app installed on it.

Use the IMEI Number

Every android phone carries a unique IMEI number (International Mobile Equipment Identity Number). It will be printed at the back of your device. If you are unable to find the number, you have to launch your phone app and dial the number *#06#. This will give you the IMEI number of your phone. Store this number in a safe place so that it helps you in locating your phone when it is lost.
When you file a complaint, this number has to be added in the report. Your service provider uses this number to track your phone and tell you where it is. No matter if the person using the phone is using a different SIM card or has switched off the phone. Once the device is traced, you can request your service provider to block it from using.
This is one of the easy ways of locating your lost Android phone or tablet.

Plan B

Another way of tracking your lost Android gadget in no time is through Plan B app. This app does not require you to install any recovery software previously but still helps in finding your lost phone. All you need to do is log on to your Google play account. Lookout mobile security offers free software called Plan B. Download the software from play store to your phone. This will be possible only if your phone is within the Internet coverage area. Wait for some time and then send the keyword “locate” without the quotes through SMS to your phone. And a map showing where your equipment is will be sent to your Gmail account. This app is very much useful in situations where you don’t have IMEI number.
If you have installed and configured any of these below android software previously, there is good chance of finding it.
You can log on to Google Play store > My Android Apps, on your computer and check if you have installed any of the following apps previously.

Lookout Security and Antivirus

Lookout is the best android app for security and antivirus. So far, it has received millions of downloads. Just recall if you have installed this on your phone.
If you have activated the option “Missing Device” in this app, it is easy to find your device. If you have also enabled “Signal Flare” option, you can trace the last known location of your android device. This is helpful in case your phone battery is dead or tablet is switched off.
Now sign in Lookout to locate your device. The map shows the location of your phone. If you are at a short distance from the tablet, you can choose Scream option to make a loud noise to find it.

Android Device Manager

Google has recently released a new locator feature for Android gadgets called Android Device manager, which helps its users locate their lost or stolen phones and tablets. It functions in the same way as Lookout and Samsung’s “Find My Mobile”. Here’s how to use Android Device Manager.
Go to the Google Settings app, then select Android device manager. By default the locator feature is activated but to activate remove data wipe, select the box next to “Allow remote factory reset”, then select “activate”.
To use this feature, open the site https://www.google.com/android/devicemanager and sign in to your Google account. You may be prompted for permission to allow Android Device Manager to use location data. Select the Accept tab to continue.
Now you will be provided with a map that shows the location of your device along with other details such as the name of the place, when it was last used and more. The location data doesn’t help you if your phone is misplaced somewhere in your home. Instead of making a call to your phone using other’s phone, you can call your phone directly from Android Device Manager. This will make your device to ring with high volume for 5 minutes, even if it’s in silent or vibrate mode.
One feature that is missing in Android Device Manager is remote locking, which can be useful in preventing a stranger from accessing your data, while you’re tracking its location.
Apart from these, there are other apps such as Android Lost, Where do My Droid and GadgetTrak that help you in finding your lost Android phone/Tablet.

Thursday, 1 October 2015

How to Spy on a Cell Phone

How to Spy on a Cell Phone

Need to Spy on a Cell Phone?
Here’s a Complete Guide to Spy on Calls, SMS, Contacts & More…
How to Spy on Cell phonesWith the advancement in the technology, cell phones have just turned themselves into powerful mini-computers. While some people use cell phones to exchange secret messages and maintain illicit relationships, many children also misuse cell phones for storing and watching inappropriate content. Therefore, in order to investigate the truth it becomes inevitable for people to spy on cell phones of their loved ones or children.

What’s the Best Software to Spy on Cell Phone?

To spy on cell phones, there exists hundreds of spy programs on the market where a majority of them are nothing more than a crap. However, there are a few genuine spy programs as well and MobiStealth is one among them. After testing a handful of popular cell phone spy programs, I conclude MobiStealth as the clear winner and best among all.
MobiStealth is one of the best and most popular software out there to spy on cell phones. It offers an effective means to monitor the target cell phone and record activities like phone calls, text messages, GPS location, emails, web activities and much more. All the monitoring/recording process takes place in a complete stealth mode, so that the target user never gets to know that he/she is under surveillance. MobiStealth has every feature that a true spy software should have. This makes it a complete cell phone spying kit.
 
MobiStealth
 

MobiStealth Features:

Here is a list of mobile spying features that you get with MobiStealth:
  • Phone Call Logs – Spy on each incoming and outgoing call number on the target cell phone along with time stamp.
  • SMS Logging – Spy on both incoming and outgoing SMS.
  • Phone Book Spy – Gain access to all the contacts that is stored on the target cell phone.
  • Spy on Web Web Activity – The program records all web activities including emails, websites visited, Facebook, WhatsApp, YouTube and more.
  • GPS Location Tracking – Track the exact location of the cell phone user at any given time.
  • Cell ID Tracking: – With this option, it is possible to track the cell phone’s location during the absence of GPS.
  • SMS Commands – Remotely send SMS commands to lock/unlock the cell phone usage or delete call history, SMS logs, photos and videos from the target phone at any time.
  • Remote Device Lock or Wipe – You can remotely lock the target cell phone or wipe all its data at anytime you wish.
  • Keylogging – Records keystrokes typed which includes passwords and other sensitive information.
  • Stealth Operation – Operates in a covert mode so that the presence of the spy software remains unnoticed.
  • No Jail-Break Required – Unlike most other spy programs, MobiStealth can operate successfully without the need to jail-break the cell phones.
If you are a parent, MobiStealth can offer you an additional help as it supports a handful of control features as well:
  • Application Blocking – You have the option to block certain applications from being accessed on the target cell phone.
  • Incoming Call Blocking – Block unwanted incoming calls on the target cell phone.

How it Works?

MobiStealth-WorkingAfter your purchase, you can directly download MobiStealth onto the target cell phone. Installation process takes only a few minutes (2-3 min approx).
After the installation, each activity on the target cell phone is recorded and uploaded to the MobiStealth servers. You can login to your MobiStealth online account from your PC (or any computer in the world) to spy on the logs at any time. The logs contain Text messages, Contacts List, Call History, GPS Locations and many other information as mentioned above.

Compatible Cell Phones:

MobiStealth is compatible with most types of cell phones currently available in the market including:
  • Android Phones
  • iPhone
  • iPod and Tablets
  • Blackberry
You can download MobiStealth from the following link:
Download MobiStealth – Android, iOS & BlackBerry

DISCLAIMER: USAGE OF SPYWARE WITHOUT PRIOR USER CONSENT MAY BE AGAINST YOUR LOCAL LAWS AND YOU DO IT AT YOUR OWN RISK!

How To Shutdown Your Computer Using Your Cellphone

How To Shutdown Your Computer Using Your Cellphone


Hi, do you want to learn a trick about “how to shut down your computer using your cell phone”. Are you always hiring the best way? Then, today you learn this trick easily in a simple way as just need to look carefully this step to step tutorial about “how to shut down your computer using your cell phone”.
Note: you can complete this trick in every operating system but, here we are representing this tutorial in “Windows 7 Professional”.
So let’s start, first open notepad as go to-> Start- All Programs- Accessories- Notepad. You can also open it in other way as go to-> Start and click on run and there type- “notepad”. Then, you will get notepad (simple editor) in front of window screen. Then, type in notepad “shutdown –s” and save this file anywhere where you want but, save with file as named “shutdown.bat” in your operating system. Illustrated at below picture-


After above process, the second step is to create your “Gmail” account or other account like yahoo for email id but, here showing Gmail. If you already have a Gmail account means having email id then, forget this step and if not as for this just search on internet as type in URL box- “gmail.com” and hit enter button from your keyboard. Then you will get, see image below-

On this page, click on “Create an Account” as shown above. Then, you will get a form where you need to fill your details like first name, last name, birth date and many more as follow instructions carefully and you will get you unique email id through that page.
Now, the next step is to create an email for Microsoft outlook (MS-outlook) and also configure some settings. So, just open MS outlook as go to-> Start – All Programs – Microsoft Office and click on Microsoft Office Outlook (any version like 2003, 2007, 2010). If you don’t have MS outlook in your operating system then, you can purchase this software online. Here in this tutorial we are showing MS-outlook 2003.

After open, go to-> Tools – Email Accounts… Click on Email Accounts…

So you will get this window-

Click on check box- “Add a new e-mail account” as shown as above and click next. So you get-

Click on Check box- “POP3” and click on Next >
You will get-

So, enter your name and e-mail address “email id” as you get through Gmail as illustrated whole fact above. In server Information, enter in Incoming mail server (POP3): “pop.gmail.com” and in Outgoing (SMTP): “smtp.gmail.com”. Enter you username and password also as you can enter your desired username and password. After whole click on more settings as all things are shown above, visit carefully.
In more settings, you will get this screen-

Click on Outgoing Server as will get this-

So, click on Check box as mouse indicating in upper image.
After this, click on Advanced as visit below-

In Advanced, change the value as enter in Incoming server (POP3): 995 and enter in outgoing (SMTP): 25 and click on all checkboxes and finally click on Ok button as shown above. Just do copy of above.
Then, you will get back to previous screen as then, click on next as shown below-

And finally, click on finish,
Then, go to-> Tools – Send\Receive – Send\Receive Settings – Define Send\Receive Groups (Ctrl+Alt+S). Given below-

After Click, you will get this screen-

So check your screen as do copy of above picture. In this, especially check, checkbox- Schedule an automatic send\receive every (1) minutes. And finally click on close.
Now, the last step is to manipulate our computer (ms-outlook) with text message as for this, we have to set up of rules and alerts on outlook. So, again go to-> Tools – Rules and Alerts. See image below-

Then, you will get Rules and Alerts Screen as there click on New Rule as see below-

In New Rule, you will get Rule Wizard .So, just click on check box- “start from a blank rule” and click on next as visit image below-

Now, the next step is as click on check box- “with specific words in the subject or body” and click on specific words as shown below-

Through click, you will get Search Text wizard as write- shutdown and add and click on ok button and finally click on next

As you will on next, click on check box- start application and below click on application as though click you will get an open wizard as visit below

In open wizard, open your file- “shutdown.bat” as you created and saved firstly above on a particular location.
After this, you will get this wizard again as click on next.

Again, click on next-

Click on finish

And finally click on Apply and then, on OK as shown below

So, all above process is the complete whole process to shut down your computer via cell phone in less than a minute. Now, you can open your Gmail account in cell phone and just send a text message to your Gmail account saying “shutdown” w/o quotation and you will found that your computer will be shutdown in a minute. If you are out of your city as wants to shut down your computer using your Cell phone in a minute as this is the best way. Finally, are you still thinking as How to shut down your Computer using your Cell Phone? Then, just follow this tutorial now as you will get result within hour.
We hope you like this briefly described tutorial. Just does this now…  

Tuesday, 29 September 2015

How to Use WhatsApp on your Pc/Laptop/Tablet – Web Browser

 How to Use WhatsApp on your Pc/Laptop/Tablet – Web Browser

Hey Guys, a good news!! Now WhatsApp is available on our Pc/laptop/tablet. Here we gonna use WhatsApp on our web browser directly. As earlier, I’ve shown you about How to install WhatsApp on Computer/Laptop – Windows 7/8, Mac by using bluestacks software, today we don’t need any softwares or emulators to use WhatsApp on our desktop. Officially WhatsApp company has released this new feature ‘WhatsApp Web‘. So by using this new feature, we are gonna use Whatsapp on our PC/Laptop. :)

Here we need to note one thing, ‘WhatsApp Web’ means this is not another Whatsapp account or new Whatsapp account. We are simply using the same Whatsapp account on our computer/laptop and our phone. Till now whatever we did on the mobile Whatsapp, the same things we are gonna do on the web browser Whatsapp.
“WhatsApp Web is a computer based extension of the WhatsApp account on your phone. The messages you send and receive are fully synced between your phone and your computer, and you can see all messages on both devices”, said the company.

So let’s get into the simple tutorial. It’s so easy to do and all it takes is few mins of time only!! 😉

Requirements to use Whatsapp on our Pc/Laptop/tablet – Web Browser:
1) Google chrome web browser. (Soon other browsers will be supported too)
2) WhatsApp enabled smartphone – Android, Blackberry, Windows Phone, Nokia S60, Blackberry 10.
At present, iPhone users cannot use this new feature. Soon they will get it too!!
3) Your Whatsapp account should be active.
4) Your Whatsapp account should be updated to the latest version.
5) A Good internet connection for both your phone and your computer.
So make sure that you follow all these requirements. Now we’ll get into the procedure,

Steps to use Whatsapp on our Pc/Laptop/Tablet – Web Browser:
1) Go to https://web.whatsapp.com/ on your chrome browser. Now you will see a QR code which needs to be scanned by your phone.

HOW TO USE WHATSAPP ON YOUR PC/LAPTOP/TABLET – WEB BROWSER.

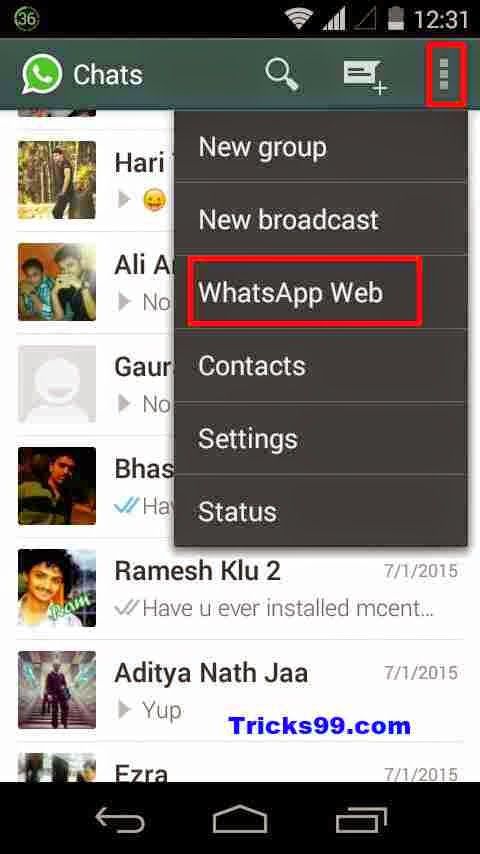
2) Now open Whatsapp on your phone and go to Menu > ‘WhatsApp Web‘.

HOW TO USE WHATSAPP ON YOUR PC/LAPTOP/TABLET – WEB BROWSER.

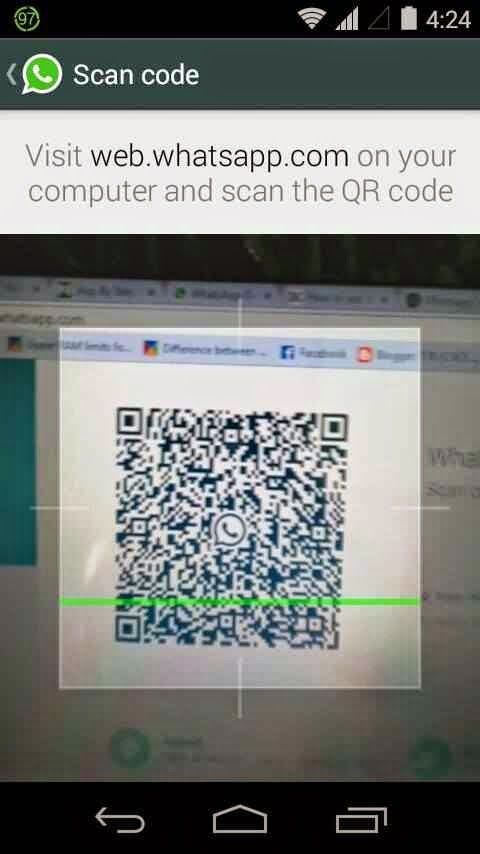
3) Now when you click ‘WhatsApp Web’ on your phone, a scanner will open. Now you need to scan the Qr code on the chrome page of step 1 by your mobile. So scan the code by placing your phone cam before the code on chrome page.

scanning-whatsapp-webpage-qr-code-compressor

4) So when you scan the code, automatically your WhatsApp account will be opened on your web browser. That’s it!! Now enjoy by using your WhatsApp on your computer/laptop/tablet – browser.

whatsapp-on-pc-chrome-laptop-browser2-compressor


Another interesting feature about ‘WhatsApp Web’ is it allows us to turn on ‘Desktop Notifications’ on our browser so that even when our browser is minimised we will get alerts for any new messages. And you should note that it allows only one Web session at a time. You’ll also have a ‘Log out’ feature on Whatsapp web. So when you are logged out, again you need to do the same steps to log in.

I hope you will like this tutorial. If you have any doubts about regarding how to use WhatsApp on your Pc/Laptop/Tablet – Web Browser then you can see the troubleshooting steps on official Whatsapp site by clicking here or you can leave your comments below. Please share this post with your friends and help us to grow by sharing our site