Breaking News
Loading...
Showing posts with label Blogger Widget. Show all posts

Wednesday, 14 October 2015

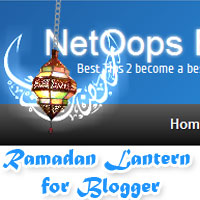
Add Animated Ramadan Lantern Widget/Ramadan Hanging Light to Blogger?

Add Animated Ramadan Lantern Widget/Ramadan Hanging Light to Blogger?

 This animated hanging light created in flash so your browser should support Flash Player,Otherwise you have to install Flash Player. In newer Operating Systems (Windows 7, Windows 8) Flash Player already installed it.Flash Animated Ramadan Lantern in top of our blog,you can see a hanging Lantern spinning to left to right then also back with a glowing Ramadan Kareem in background. This Ramadan Lantern looks very nice in Dark backgrounds,Blue,Orange Backgrounds.
You can see the demo in top of our Blog

How To Add Animated Ramadan Lantern ?

  • Sign In to Blogger Dashboard
  • Go to Template -> Edit HTML
  • Find (Ctrl+F) </body>
  • Copy the Following code just above it
 <!--  Ramadan Lantern www.netoopsblog.com -->
<div align='center'>
<table border='0' cellpadding='0' cellspacing='0' width='900'>
<tr>
<td height='0' width='900'>
<div style='float:top right; position:absolute; overflow:visible; left:45px; top:0px; height:192px; width:144px z-index: 9999;'><a href="http://www.www.netoopsblog.com"></a><object border='0' classid='clsid:D27CDB6E-AE6D-11CF-96B8-444553540000' codebase='http://download.macromedia.com/pub/shockwave/cabs/flash/swflash.cab#version=6,0,40,0' height='144' id='obj2' width='192'><param name='movie' value='http://netoopscodes.googlecode.com/svn/branches/swf/ramzan-hanging-lanterns.swf'/><param name='quality' value='High'/><param name='wmode' value='transparent'/><embed height='144' name='obj2' pluginspage='http://www.macromedia.com/go/getflashplayer' quality='High' src='http://netoopscodes.googlecode.com/svn/branches/swf/ramzan-hanging-lanterns.swf' type='application/x-shockwave-flash' width='192' wmode='transparent'/></object>
</div>
</td>
</tr>
</table>
</div>
<!--  Ramadan Lantern By www.netoopsblog.com -->
Click on  Save. It's done. Check your Blog

Awesome NetOopsblog Subscription Widget for blogger

Awesome NetOopsblog Subscription Widget for blogger

NetOopsblog Subscription box Blogger
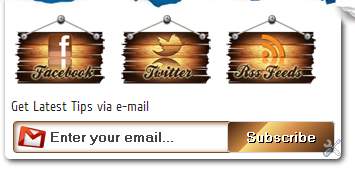
This post is about how to add a Subscription Box like our NetOops blog. Subscription box contains Facebook, Twitter, RSS Feed, e-mail subscription. This widget is based on a wooden theme. Facebook, Twitter, RSS Feed links are shown as Natural Wooden Sticky Boards. In this tutorial i am adding a new e-mail subscription box with wooden theme.


Demo is in the Right of this Blog

What's inside this article??

Subscription Box With Fully Wooden Theme

  • Go to Blogger Dashboard
  • Go to Layout 
  • Select Add a Gadget
  • You can type title any
  • And Copy the following code in the content.
Demo of Fully Wooden Theme

 Important: If you don't want Mouse over effect of Images in the Subscription box, please delete the REDhighlighted code,. If you want then leave it there.
    <style type="text/css">
     /* Delete form Here*/  
    img.beintouch:hover {
        background: none repeat scroll 0 0 #D6D6D6;
        border-radius: 16px 16px 16px 16px;
        box-shadow: 0 0 10px #565656;
    }
    /* Delete to Here*/
    .emailtext {
        background: url("https://blogger.googleusercontent.com/img/b/R29vZ2xl/AVvXsEgpm-2BUmGs4LpmDKSp1v51aXMNinrQyT4PZ_QS2DLprgX8-ryqO1x-ur8lc2bVbe-OCNm9-POxFkIwQwibQtuN6X4e0OuPIYkVTWgP7b8mkF6lyrXLqT5vNKPhYuJ_PKep6-AhJNYGWxg/s1600/mailbox.png") no-repeat scroll 4px center transparent;
        border: 1px solid #7E4E27;
        border-radius: 4px 4px 4px 4px;
        box-shadow: 1px 1px 4px #7E4E27 inset;
        color: #444444;
        font-weight: bold;
        margin-left: 2px;
        padding: 7px 15px 7px 35px;
        text-decoration: none;
        width: 176px;
    }
    .ebutton {
        background: -moz-linear-gradient(-45deg, #3C1F0E 0%, #D28A47 30%, #F9E183 30%, #D28A47 55%, #3C1F0E 100%) repeat scroll 0 0 transparent;
        border: 1px solid #D3D3D3;
        border-radius: 4px 4px 4px 4px;
        color: #FFFFFF;
        cursor: pointer;
        font-weight: bold;
        margin-left: -18px;
        margin-top: 5px;
        padding: 6px 15px;
        text-decoration: none;
        text-shadow: 1px 1px 0 #000000;
    }
    </style>
    <table align="center" width="317px" cellspacing="0px" cellpadding="1px"><tbody><tr><td><a target="_blank" rel="nofollow" href="http://www.facebook.com/pages/NetOops-Blog/159796530791611"><img src="https://blogger.googleusercontent.com/img/b/R29vZ2xl/AVvXsEgvjhKIYYqHJ4cBqPTQZdKWdy6veFkZO2T4oVEY_KhvAQtbsWgW_8KfjqCTaHMoK7sfjaVShbT3_InIbafhonVLY8keuVQM6KnDZPOl4IEEloSEfuGoRwAHigdZIp9JA0ekVsA8gf2ZUBU/s1600/woden+board+facebook_netoops.png" class="beintouch" /></a></td><td><a target="_blank" href="http://twitter.com/netoopsblog/" rel="nofollow"><img src="https://blogger.googleusercontent.com/img/b/R29vZ2xl/AVvXsEgudvLMtwU_jEjveYlQvKxrffzIXSGqitW5rXdHzOdTrqudvHolAh1hGF7B17hnvB5yKm1lmXOyapMPxOZLfmMj-jJX6TPVzWwD1zMcKJSXRofyltKAaq4ZmpHr8TePoDYkknol6tJXvwU/s1600/woden+board+twitter_netoops.png" class="beintouch" /></a></td><td><a target="_blank" href="http://feeds.feedburner.com/NetOopsBloggerTricks" rel="nofollow"><img src="https://blogger.googleusercontent.com/img/b/R29vZ2xl/AVvXsEjhg_9R0S6U1sOugqvdZUQcy7qcR7PxuZiyp7vmvcxnxwYUW0RRoKlaXpgeCjAVKDf5sibAUQVxlj_qhcbnXLAcBZVay5Z3IjTx56Ic_RZZLXQWTpX9KKrUfP10T_LRLjx739yhyja4m6M/s1600/woden+board+RSS1_netoops.png" class="beintouch" /></a><a href="http://www.netoopsblog.com"></a></td></tr></tbody></table>
    <div>Get Latest Tips via e-mail</div>
    <form target="popupwindow" style="margin: 0pt;" onsubmit="window.open('http://feedburner.google.com/fb/a/mailverify?uri=netoopsbloggertricks', 'popupwindow', 'scrollbars=yes,width=550,height=520');return true" method="post" class="emailform" action="http://feedburner.google.com/fb/a/mailverify">
    <input type="hidden" value="NetOopsBloggerTricks" name="uri" />
    <input type="hidden" value="en_US" name="loc" />
    <input type="text" value="Enter your email..." onfocus="if (this.value == &quot;Enter your email...&quot {this.value = &quot;&quot;}" onblur="if (this.value == &quot;&quot {this.value = &quot;Enter your email...&quot;;}" name="email" class="emailtext" />
    <input type="submit" value="Subscribe" title="" class="ebutton" alt="" />
    </form>


    Change the BLUE highlighted code with FACEBOOK PAGE URL, TWTTER, FEED URL, FEED ID respectively.

    Subscription Box With Default Basic Wooden Theme

    • Go to Layout 
    • Select Add a Gadget
     Important: If you don't want Mouse over effect of Images in the Subscription box, please delete the REDhighlighted code,. If you want then leave it there.
    <style type="text/css">
     /* Delete form Here*/  
    img.beintouch:hover {
        background: none repeat scroll 0 0 #D6D6D6;
        border-radius: 16px 16px 16px 16px;
        box-shadow: 0 0 10px #565656;
    }
    /* Delete to Here*/
    </style>
    <table align="center" width="317px" cellspacing="0px" cellpadding="1px"><tbody><tr><td><a target="_blank" rel="nofollow" href="http://www.facebook.com/pages/NetOops-Blog/159796530791611"><img src="https://blogger.googleusercontent.com/img/b/R29vZ2xl/AVvXsEgvjhKIYYqHJ4cBqPTQZdKWdy6veFkZO2T4oVEY_KhvAQtbsWgW_8KfjqCTaHMoK7sfjaVShbT3_InIbafhonVLY8keuVQM6KnDZPOl4IEEloSEfuGoRwAHigdZIp9JA0ekVsA8gf2ZUBU/s1600/woden+board+facebook_netoops.png" class="beintouch" /></a></td><td><a target="_blank" href="http://twitter.com/netoopsblog/" rel="nofollow"><img src="https://blogger.googleusercontent.com/img/b/R29vZ2xl/AVvXsEgudvLMtwU_jEjveYlQvKxrffzIXSGqitW5rXdHzOdTrqudvHolAh1hGF7B17hnvB5yKm1lmXOyapMPxOZLfmMj-jJX6TPVzWwD1zMcKJSXRofyltKAaq4ZmpHr8TePoDYkknol6tJXvwU/s1600/woden+board+twitter_netoops.png" class="beintouch" /></a></td><td><a target="_blank" href="http://feeds.feedburner.com/NetOopsBloggerTricks" rel="nofollow"><img src="https://blogger.googleusercontent.com/img/b/R29vZ2xl/AVvXsEjhg_9R0S6U1sOugqvdZUQcy7qcR7PxuZiyp7vmvcxnxwYUW0RRoKlaXpgeCjAVKDf5sibAUQVxlj_qhcbnXLAcBZVay5Z3IjTx56Ic_RZZLXQWTpX9KKrUfP10T_LRLjx739yhyja4m6M/s1600/woden+board+RSS1_netoops.png" class="beintouch" /></a><a href="http://www.netoopsblog.com"></a></td></tr></tbody></table>
    <div>Get Latest Tips via e-mail</div>
    <form target="popupwindow" style="margin: 0pt;" onsubmit="window.open('http://feedburner.google.com/fb/a/mailverify?uri=netoopsbloggertricks', 'popupwindow', 'scrollbars=yes,width=550,height=520');return true" method="post" class="emailform" action="http://feedburner.google.com/fb/a/mailverify">
    <input type="hidden" value="NetOopsBloggerTricks" name="uri" />
    <input type="hidden" value="en_US" name="loc" />
    <input type="text" value="Enter your email..." onfocus="if (this.value == &quot;Enter your email...&quot{this.value = &quot;&quot;}" onblur="if (this.value == &quot;&quot {this.value = &quot;Enter your email...&quot;;}" name="email" class="emailtext" />
    <input type="submit" value="Subscribe" title="" class="ebutton" alt="" />
    </form>


    Change the BLUE highlighted code with FACEBOOK PAGE URL, TWTTER, FEED URL, FEED ID respectively.

    I think this widget helps you, Please share and like...

    Awesome Rainbow animation Link Widget for Blogger

    Awesome Rainbow animation Link Widget for Blogger

    This is a simple Blogger Blog Trick,Changing the color of Link when Mouse over it.7 colors are changing like animation when hover the link.
    Follow the simple steps below..


    If you are a beginner in HTML editing,Use our 1 Click Widget Below(Click Add to Blogger Button below)


    Install Rainbow Animation Hover Effect Manually.

    Note:Remember that Back up your Template First.(How to Backup Template)

    • Sign In to you Blogger Account.
    • Go to Design->Edit HTML
    • Find <head> section and Place the below code inside it.

    <script type='text/javascript'>
    //<![CDATA[
    var rate = 20;
    if (document.getElementById)
    window.onerror=new Function("return true")
    var objActive;  // The object which event occured in
    var act = 0;    // Flag during the action
    var elmH = 0;   // Hue
    var elmS = 128; // Saturation
    var elmV = 255; // Value
    var clrOrg;     // A color before the change
    var TimerID;    // Timer ID
    if (document.all) {
    document.onmouseover = doRainbowAnchor;
    document.onmouseout = stopRainbowAnchor;
    }
    else if (document.getElementById) {
    document.captureEvents(Event.MOUSEOVER | Event.MOUSEOUT);
    document.onmouseover = Mozilla_doRainbowAnchor;
    document.onmouseout = Mozilla_stopRainbowAnchor;
    }
    function doRainbow(obj)
    {
    if (act == 0) {
    act = 1;
    if (obj)
    objActive = obj;
    else
    objActive = event.srcElement;
    clrOrg = objActive.style.color;
    TimerID = setInterval("ChangeColor()",100);
    }
    }
    function stopRainbow()
    {
    if (act) {
    objActive.style.color = clrOrg;
    clearInterval(TimerID);
    act = 0;
    }
    }
    function doRainbowAnchor()
    {
    if (act == 0) {
    var obj = event.srcElement;
    while (obj.tagName != 'A' && obj.tagName != 'BODY') {
    obj = obj.parentElement;
    if (obj.tagName == 'A' || obj.tagName == 'BODY')
    break;
    }
    if (obj.tagName == 'A' && obj.href != '') {
    objActive = obj;
    act = 1;
    clrOrg = objActive.style.color;
    TimerID = setInterval("ChangeColor()",100);
    }
    }
    }
    function stopRainbowAnchor()
    {
    if (act) {
    if (objActive.tagName == 'A') {
    objActive.style.color = clrOrg;
    clearInterval(TimerID);
    act = 0;
    }
    }
    }
    function Mozilla_doRainbowAnchor(e)
    {
    if (act == 0) {
    obj = e.target;
    while (obj.nodeName != 'A' && obj.nodeName != 'BODY') {
    obj = obj.parentNode;
    if (obj.nodeName == 'A' || obj.nodeName == 'BODY')
    break;
    }
    if (obj.nodeName == 'A' && obj.href != '') {
    objActive = obj;
    act = 1;
    clrOrg = obj.style.color;
    TimerID = setInterval("ChangeColor()",100);
    }
    }
    }
    function Mozilla_stopRainbowAnchor(e)
    {
    if (act) {
    if (objActive.nodeName == 'A') {
    objActive.style.color = clrOrg;
    clearInterval(TimerID);
    act = 0;
    }
    }
    }
    function ChangeColor()
    {
    objActive.style.color = makeColor();
    }
    function makeColor()
    {
    // Don't you think Color Gamut to look like Rainbow?
    // HSVtoRGB
    if (elmS == 0) {
    elmR = elmV;    elmG = elmV;    elmB = elmV;
    }
    else {
    t1 = elmV;
    t2 = (255 - elmS) * elmV / 255;
    t3 = elmH % 60;
    t3 = (t1 - t2) * t3 / 60;
    if (elmH < 60) {
    elmR = t1;  elmB = t2;  elmG = t2 + t3;
    }
    else if (elmH < 120) {
    elmG = t1;  elmB = t2;  elmR = t1 - t3;
    }
    else if (elmH < 180) {
    elmG = t1;  elmR = t2;  elmB = t2 + t3;
    }
    else if (elmH < 240) {
    elmB = t1;  elmR = t2;  elmG = t1 - t3;
    }
    else if (elmH < 300) {
    elmB = t1;  elmG = t2;  elmR = t2 + t3;
    }
    else if (elmH < 360) {
    elmR = t1;  elmG = t2;  elmB = t1 - t3;
    }
    else {
    elmR = 0;   elmG = 0;   elmB = 0;
    }
    }
    elmR = Math.floor(elmR).toString(16);
    elmG = Math.floor(elmG).toString(16);
    elmB = Math.floor(elmB).toString(16);
    if (elmR.length == 1)    elmR = "0" + elmR;
    if (elmG.length == 1)    elmG = "0" + elmG;
    if (elmB.length == 1)    elmB = "0" + elmB;
    elmH = elmH + rate;
    if (elmH >= 360)
    elmH = 0;
    return '#' + elmR + elmG + elmB;
    }
    //]]>
    </script>
    • Save It and Enjoy. . . !

    I think you enjoyed this post.Surely you will get excited after using this widget.

    Add Flying Letters below Mouse Pointer Animation

    Add Flying Letters below Mouse Pointer Animation

    flying letters below mouse
    How to setup flying letters below mouse pointer.This a simple article that Spice your Blog.After inserting this Code,When you move mouse over your Blog, you will see that Letters you SET in the below code will flying like a Animation.


    Install Flying Letters Below Mouse Widget

    Make sure you had Backed up your Template(How To BackUp Template?)

    • Sign In to your Blogger Account
    • Go to Design->Edit HTML
    • Find </body> (Find Easily Using Ctrl+F) and Copy and Paste the below Code above </body>
    <script type="text/javascript">
    var text=&#39; ENTER YOUR FLYING TEXT HERE &#39;;
    </script>
    <script src="http://netoopscodes.googlecode.com/svn/branches/Js%20files/mousetail.js" type="text/javascript">
    </script>
    • Save it,its all.....you are almost done.

    ADD A EXPANDABLE SOCIAL NETWORK GADGET


    Add Expandable Social Network Widget
    • Login to Blogger
    • Copy The Code Below


    <style>#WG-SWS {width: 260px;margin: 5px 20px;padding:5px;}#WG-SWS li {cursor: pointer;height: 48px;position: relative;list-style-type: none;}#WG-SWS .icon {background: #D91E76 url('https://blogger.googleusercontent.com/img/b/R29vZ2xl/AVvXsEgurYYx-QVC24PWNRk_2LPVNYaAesi4EheBgQeZZpqr8Tc-NSolYawUsYHdDwJJORo6NtBilT_SAS5Qkq4s543iJWNbugjLxNM2lelZNxPYB-DiS-lt_ylwrCE6YLNb7cK-5DrN5jZUxKM/s1600/NBT-Social_Button.png') 0 0 no-repeat;background-color: rgba(217, 30, 118, .42);border-radius: 30px;display: block;color: #0033CC;float:none;height: 48px;line-height: 48px;margin: 5px 0;position: relative;text-align: left;text-indent: 90px;text-shadow: #333 0 1px 0;white-space: nowrap;width: 48px;z-index: 5;-webkit-transition: width .25s ease-in-out, background-color .25s ease-in-out;-moz-transition: width .25s ease-in-out, background-color .25s ease-in-out;-o-transition: width .25s ease-in-out, background-color .25s ease-in-out;transition: width .25s ease-in-out, background-color .25s ease-in-out;-webkit-box-shadow: rgba(0, 0, 0, .28) 0 2px 3px;-moz-box-shadow: rgba(0, 0, 0, .28) 0 2px 3px;-o-box-shadow: rgba(0, 0, 0, .28) 0 2px 3px;box-shadow: rgba(0, 0, 0, .28) 0 2px 3px;text-decoration: none;}#WG-SWS span:hover {visibility: hidden;}#WG-SWS span {display: block;top: 15px;position: absolute;left: 90px;}#WG-SWS .icon {color: #fafafa;overflow: hidden;}#WG-SWS .fb {background-color: rgba(45, 118, 185, .42);background-position: 0 -382px;}#WG-SWS .twit {background-color: rgba(0, 161, 223, .42);background-position: 0 -430px;}#WG-SWS .google {background-color: rgba(167, 0, 0, .42);background-position: 0 -478px;}#WG-SWS .pint {background-color: rgba(204, 0, 0, .42);background-position: 0 -526px;}#WG-SWS .linked {background-color: rgba(0, 87, 114, .42);background-position: 0 -574px;}#WG-SWS .ytube {background-color: rgba(170, 0, 0, .42);background-position: 0 -670px;}#WG-SWS .rss {background-color: rgba(255, 109, 0, .42);background-position: 0 -718px;}#WG-SWS li:hover .icon {width: 250px;}#WG-SWS li:hover .icon {background-color: #d91e76;}#WG-SWS li:hover .fb {background-color: #2d76b9;background-position: 0 2px;}#WG-SWS li:hover .twit {background-color: #00A1DF;background-position: 0 -46px;}#WG-SWS li:hover .google {background-color: #A70000;background-position: 0 -94px;}#WG-SWS li:hover .pint {background-color: #C00;background-position: 0 -142px;}#WG-SWS li:hover .linked {background-color: #005772;background-position: 0 -190px;}#WG-SWS li:hover .ytube {background-color: #A00;background-position: 0 -286px;}#WG-SWS li:hover .rss {background-color: #EC5601;background-position: 0 -334px;}#WG-SWS .icon:active {bottom: -2px;-webkit-box-shadow: none;-moz-box-shadow: none;-o-box-shadow: none;}</style><ul id="WG-SWS"><li><a href="http://www.facebook.com/BlackHatSolution" class="icon fb">Like us on Facebook</a><span>Like us on Facebook</span> </li><li><a href="https://twitter.com/BipinChettri" class="icon twit">Follow us on Twitter</a><span>Follow us on Twitter</span> </li><li><a href="https://plus.google.com/+BipinChettri" class="icon google">Follow us on Google+</a><span>Follow us on Google+</span> </li><li><a href="http://www.pinterest.com/BipinChettri" class="icon pint">Follow us on Pinterest</a><span>Follow us on Pinterest</span> </li><li><a href="http://in.linkedin.com/BipinChettri" class="icon linked">Follow us on LinkedIn</a><span>Follow us on LinkedIn</span> </li><li><a href="http://www.youtube.com/user/BipinChettri" class="icon ytube">Follow us on Youtube</a><span>Follow us on Youtube</span> </li><li><a href="http://feeds.feedburner.com/BlackHatSolution" class="icon rss">Subscribe via RSS</a><span>Subscribe via RSS</span></li></ul></div><div style='clear: both;'></div>


    •  Change The Highlight Red Color with Your Username
    •  Paste in HTML/Javascript Widget Or paste code where you want to show it

    Thursday, 24 September 2015

    Stylish Automatic Slide Recent Post Widget

    Stylish Automatic Slide Recent Post Widget


    Adding To Blogger :


    • Go to Blogger → Layout → Add Widget → HTML/JavaScript.
    • Past the below given code & save it.


     <style scoped="" type="text/css">
    /*
    Made by newbloggerwidget.blogspot.in with lot of hardwork please keep visiting NBW
    */
    ul.abt-sidebar-slider *{-moz-box-sizing:border-box;-webkit-box-sizing:border-box;box-sizing:border-box}
    ul.abt-sidebar-slider{font:normal normal 11px Verdana,Geneva,sans-serif}
    ul.abt-sidebar-slider,ul.abt-sidebar-slider li{margin:0;padding:0;list-style:none;position:relative}
    ul.abt-sidebar-slider{width:100%;height:500px}
    ul.abt-sidebar-slider li{height:24.5%;position:absolute;padding:0;width:49.5%;float:left;overflow:hidden;display:none}
    ul.abt-sidebar-slider li:nth-child(1),ul.abt-sidebar-slider li:nth-child(2),ul.abt-sidebar-slider li:nth-child(3),ul.abt-sidebar-slider li:nth-child(4){display:block}
    ul.abt-sidebar-slider img{border:0;width:100%;height:100%}
    ul.abt-sidebar-slider li:nth-child(1){width:100%;height:49.5%;margin:0 0 2px;left:0;top:0}
    ul.abt-sidebar-slider li:nth-child(2){left:0;top:50%}
    ul.abt-sidebar-slider li:nth-child(3){left:50.5%;top:50%}
    ul.abt-sidebar-slider li:nth-child(4){width:100%;left:0;top:75%}
    ul.abt-sidebar-slider .overlayx,ul.abt-sidebar-slider li{-webkit-transition:all .4s ease-in-out;-moz-transition:all .4s ease-in-out;-o-transition:all .4s ease-in-out;-ms-transition:all .4s ease-in-out;transition:all .4s ease-in-out}
    ul.abt-sidebar-slider .overlayx{width:100%;height:100%;position:absolute;z-index:2;left:0;top:0;background-image:url(https://blogger.googleusercontent.com/img/b/R29vZ2xl/AVvXsEgO2khgjT6sU_P24Dv9CiXzfjKMIrrkrz5t-ziyOoTYLQwvpItUe3GbXRiBG6c8a96vNjy-TJR4AWd6v-tad8tmyCasZRyrFEhjNGgyLxIkzVWBufYINzvRJ6PButIV6q5obeNchXXr_R4/s1600/linebg-fade.png);background-position:50% 50%;background-repeat:repeat-x}
    ul.abt-sidebar-slider .overlayx,ul.abt-sidebar-slider img{border:4px solid #2E8DCE;-moz-border-radius:3px;-webkit-border-radius:3px;border-radius:3px}
    ul.abt-sidebar-slider li:nth-child(1) .overlayx{background-position:50% 25%}
    ul.abt-sidebar-slider .overlayx:hover{-ms-filter:"progid:DXImageTransform.Microsoft. Alpha(Opacity=10)";filter:alpha(opacity=10);-khtml-opacity:0.1;-moz-opacity:0.1;opacity:0.1}
    ul.abt-sidebar-slider h4{position:absolute;bottom:30px;z-index:2;color:white;margin:0;width:100%;padding:0 10px;line-height:1.5em;font-family:Georgia,Times,"Times New Roman";font-weight:normal}
    ul.abt-sidebar-slider li:nth-child(1) h4,ul.abt-sidebar-slider li:nth-child(4) h4{font-size:150%}
    ul.abt-sidebar-slider .label_text{position:absolute;bottom:10px;left:10px;z-index:2;color:white;font-size:90%}
    ul.abt-sidebar-slider li:nth-child(2) .autname,ul.abt-sidebar-slider li:nth-child(3) .autname{display:none}
    .buttons{margin:5px 0 0}
    .buttons a{display:inline-block;text-indent:-9999px;width:15px;height:25px;position:relative}
    .buttons a::before{content:"";width:0;height:0;border-width:8px 7px;border-style:solid;border-color:transparent #535353 transparent transparent;position:absolute;top:50%;margin-top:-8px;margin-left:-10px;left:50%}
    .buttons a.nextx::before{border-color:transparent transparent transparent #535353;margin-left:-3px}
    </style>
    <div id="featuredpostside"></div>
    <script src="http://ajax.googleapis.com/ajax/libs/jquery/1.8.0/jquery.min.js" type="text/javascript"></script>
    <script src="https://dl.dropboxusercontent.com/u/76401970/All%20Blogger%20Tricks/abt-sidebar-slider.js" type="text/javascript"></script>
    <script type='text/javascript'>
    //<![CDATA[
    FeaturedPostSide({
    blogURL:"http://newbloggerwidget.blogspot.in",
    MaxPost:8,
    idcontaint:"#featuredpostside",
    ImageSize:300,
    interval:5000,
    autoplay:true,
    tagName:false
    });
    //]]>
    </script>


     Customization:

    1. blogURL = add your blog URL here
    2. MaxPost = Total number of post
    3. Interval = Time taken to change the slider
    4. autoplay = true or false
    5. tagname = If you want to Display articles by tag/labels

    How To Add Support Us Widget For Blogger

    How To Add Support Us Widget For Blogger


    Add Support/link to us Widget for Blogger


    Support/link to us widget lets your visitors easily add your blog’s link to their blog on site just by clicking abutton.Only you have to do is add your links to this widget and then it will become easy users who wantto link to you.The cool thing is that its just a Click the button thing to do.For this you will require a small logo of your site which could fit in your sidebar.For this you will require a small logo of your site which could fit in your sidebar. 125X125 sized logo will work. Click Here to Create your own logo & upload the logo to the web and get its URL.

    Follow The Step To Add This Widget In Blog :


     <center><div class='widget-content'>
    <div style="margin-bottom: 20px;">
    <span style=" margin:0px; color: #666; font:normal 12px verdana;"><p style="margin:0px;" align="justify">If our Tutorials have really helped you a little, then kindly show your love by using the badge below:-</p></span><br/>
    <center><img src="  https://blogger.googleusercontent.com/img/b/R29vZ2xl/AVvXsEh8BbHp-5uwUkLcnJhvfBWEhU0z-5K7wj4vqXcMvFbkEh9aTk5ZU3X7QhQJnjPk91NRbuFDobz5Ibv87m0GZHZbjo-Owcne-8ZRkkIDUf3Ui7bTMI-jOz-gWD0DL_IErKBWz5CTR0Y5QxY/s1600/cooltext1565971843.gif" border="0" />
    <p><input style="width: 100px;" value="&lt;a href=&quot;http://newbloggerwidget.blogspot.com/&quot; &gt;&lt;img  border=&quot;0&quot; src=&#39; https://blogger.googleusercontent.com/img/b/R29vZ2xl/AVvXsEh8BbHp-5uwUkLcnJhvfBWEhU0z-5K7wj4vqXcMvFbkEh9aTk5ZU3X7QhQJnjPk91NRbuFDobz5Ibv87m0GZHZbjo-Owcne-8ZRkkIDUf3Ui7bTMI-jOz-gWD0DL_IErKBWz5CTR0Y5QxY/s1600/cooltext1565971843.gif&#39; rel=&quot;Blogger Widgets&quot; title=&quot;Blogger Widgets&quot;/&gt;&lt;/a&gt;" readonly onclick="this.focus();this.select()" type="text" /></p>
    <p>or try our a <a href="#">Beautiful Banner</a></p></center>
        </div></div>
    </center>

    Customize :

    • Replace the Red Highlighted Link to your logo link,
    • Replace the Blue Highlighted Link to your URL.

    Stylish Animated Blogger Cloud Labels For Blogger

    Stylish Animated Blogger Cloud Labels For Blogger


    Today publishing a simple CSS tutorial about customizing blogger label could tags.It is a type of widget that makes your blog more stylish.All the labels are appeared like round ball in Labels box.If you move your cursor, the labels will rotates.This also help blogger to increase their Traffic.I ensure you this widget perfectly works with Firefox, Google Chrome, Safari and other major browsers including IE8+.


    Follow This Step To Add This Widget In Blog :


    • Go to Blogger → Layout → HTML/JavaScript.
    • Now add the bellow code & save it.

     <div id="cbFlashContent"><p style="display:none;">Flash Labels by <a href="http://newbloggerwidget.blogspot.com/">New Blogger Widget</a></p></div><script type="text/javascript">/*<![CDATA[*/var cbFlashLabelSettings = {    blogurl        : "http://newbloggerwidget.blogspot.com",    color          : "0090ff",    hoverColor     : "FFF",    backgroundColor: "FFFFFF",    size           : 10,    speed          : 150,    width          : 300,    height         : 300,    transparency   : true};/*]]>*/</script><script type="text/javascript" src="https://googledrive.com/host/0B5gFqOZt0TRheFBWNlZMb05fNTg"></script>


    Customize :


    • Replace Red Highlighted with your blog link.

    Add Stylish Marquee Notification Bar To Blogger

    Add Stylish Marquee Notification Bar To Blogger


    Notification bar widget is one of the most popular blogger widgets. It also helps in boosting your blog’s traffic by increasing the number of page views of your blog. In this post we will discuss a new and amazing marquee notification bar for blogger blogs with a stylish moving text effect.


                                                                      Here To View Demo


    Follow This Step To Add This Marquee In Blog :

    • Go to Blogger → Layout → Add a gadget → HTML/JavaScript.
    • Now Paste the bellow code & Save it.

     <style>
    #nbwnot-cont
    {
    top:0px;
    left:0px;
    z-index:9999999;
    position:fixed;
    width:100%;
    background:#222222;
    color:#ffffff;
    font:16px georgia;
    box-shadow:2px 2px 5px  #444444;
    -moz-box-shadow:2px 2px 5px  #444444;
    -web-kit-box-shadow:2px 2px 5px  #444444;
    -goog-ms-box-shadow:2px 2px 5px  #444444;
    }
    #nbw-movtext
    {
    text-align:center;
    padding:8px;
    font-family:  Verdana,"Times New Roman",Georgia,Serif;
    font-size:12px;
    color: #ffffff;
    }
    #nbw-movtext a
    {
    color:#ffffff;
    text-decoration:none;
    font:16px georgia;
    }
    #nbw-movtext a:hover
    {
    color:yellow;
    text-decoration:none;
    }

    </style>
    <div id='nbwnot-cont'>
    <div id="nbw-movtext">
    <marquee  behavior='alternate' direction="left"
                onmouseover="this.stop();"
                onmouseout="this.start();">
              <p>
    <a href='http://newbloggerwidget.blogspot.com/2014/05/how-to-add-support-us-widget-for-blogger.html'>How To Add Support Us Widget For Blogger</a>
    |        <a href='http://newbloggerwidget.blogspot.com/2014/05/add-do-you-like-this-story-widget-below.html'>Add Do You Like This Story Widget Below Every Post</a>
    |        <a href='http://newbloggerwidget.blogspot.com/2014/05/how-to-add-widget-below-first-post-in.html'>How To Add A Widget Below First Post In Blogger</a>
    |        <a href='http://newbloggerwidget.blogspot.com/2014/05/how-to-check-facebook-fake-profile.html'> How To Check Facebook Fake Profile Photo 2014</a>
    |        <a href='http://newbloggerwidget.blogspot.com/2014/05/hack-facebook-account-with-phishing-page.html'>How To Hack Facebook Account With Phishing Page 2014</a>
    </p>
          </marquee>
    </div>
    <div>

    Features Of This Marquee :

    • It is sticky floating notification bar.
    • It is created in HTML and CSS only.
    • Light weight code which do not effect you blog’s loading time.
    • Stylish and attractive design with moving text effect.

    Customize :

    • Replace Orange color code with your post titles
    • Replace Red color code with links to these posts.