Breaking News
Loading...
Showing posts with label Anonymous. Show all posts

Tuesday, 22 December 2015

Stay Anonymous Online - Setup A VPN On Android Device

setup-vpn-on-android- www.picateshackz.com

Android is open-source software and as with all open-source material, there are a lot of options and customization that can be created because the code is open for anyone to manipulate as they see fit. This comes with, of course, a major flaw… that flaw being that it’s easier to find ways to add malicious code and find “zero-day” exploits to read/steal data from the device. One thing that can help as far as sending and receiving data is a VPN. A VPN app encrypts one’s data transfers to safeguard against malicious “eyes.”


One should seriously consider using a Virtual Private Network (VPN) service if they perform below activities often from their mobile devices:

  • Using (open) public Wi-Fi (i.e. – from coffee shops, cafes, restaurants, etc.)
  • Performs online transactions (i.e. – online banking, paying bills, online shopping, money transfer, etc.)
  • Using one’s phone for emails, consistently.
  • Using Messenger, Hangouts, Skype calls on a regular basis.

Based upon a new poll, people prefer downloading a VPN application on their Android devices versus manually setting it up, because it saves time and energy. The Virtual Private Network application encrypts and re-routes information that is being received and sent from a device to protect you against the dirty tricks of online criminals and eavesdroppers.

Although we appreciate the difficult works of entrepreneurs who are applying all of their energies to ensure that our information is secure, it is always suggested that one goes for a VPN service that is hosted on a large scale and has positive reviews from reputable security websites.

In addition, most larger VPN providers offer custom VPN clients for mobile devices. However, there are several providers that have failed to catch up with the pace of the trade, and need efforts from our end to establish their clients’ connections using our cell phones. If you select a VPN provider that has no pre-built client, then one can always utilize these instructions for manual setup on their Android device(s).

First, select the process or the protocol you wish to configure your VPN to use. Here are the protocols supported by the Android OS:

PPTP
L2TP/IPSec (PSK)
L2TP/IPSec (RSA)
IPSec Xauth (PSK)
IPSec Xauth (RSA)
IPSec Hybrid (RSA)

Based on the protocol you want to take advantage of, ask your VPN service provider to provide you with the preceding details:


PPTP

a) DNS Search Domains
b) DNS Servers
c) Forwarding Routes


L2TP/IPSec (PSK)

a) Server Address
b) L2TP Secret
c) IPSec Identifier
d) IPSec Pre-Shared Key
e) DNS Search Domains
f) DNS Servers
g) Forwarding Routes


L2TP/IPSec (RSA)

a) Server Address
b) L2TP Secret
c) IPSec User Certificate
d) IPSec CA Certificate
e) IPSec Server Certificate
f) DNS Search Domains
g) DNS Servers
h) Forwarding Routers


IPSec Xauth (PSK)

a) Server Address
b) IPSec Identifier
c) IPSec Pre-Shared Key
d) DNS Search Domains
e) DNS Servers
f) Forwarding Routes


IPSec Xauth (RSA)

a) Server Address
b) IPSec User Certificate
c) IPSec CA Certificate
d) IPSec Server Certificate
e) DNS Search Domains
f) DNS Servers
g) Forwarding Routes


IPSec Hybrid (RSA)

a) Server Address
b) IPSec CA Certificate
c) IPSec Server Certificate
d) DNS Search Domains
e) DNS Servers
f) Forwarding Routes


NOTE: Your VPN provider may not support ALL of these protocols, however make sure you request these components, so the VPN provider is aware that they are not dealing with some kid who used his father’s credit card to buy something he possess no knowledge about.


Step 1: From your home screen, go to the app drawer and choose ‘Settings.’ You should see something similar to the screenshot below:


setup-vpn-on-android- www.picateshackz.com


step 2: Choose ‘More…’

step 3: 
Once inside ‘More,’ you will see ‘VPN’ as an option on the settings list. Touch it to take you to the profile page.

setup-vpn-on-android- www.picateshackz.com


step 4:
 At this point, you should be presented with a blank screen (may vary for different devices as the picture is of stock Android) with a ‘+’ sign at the top. Next to it is the “Options” menu, the place where you can add, edit, activate and remove VPN profiles and configurations.

setup-vpn-on-android- www.picateshackz.com


step 5: Click on the plus sign on the top right corner of the touch screen. Once you touch it, it lets you add a manual Virtual Private Network profile. (You can add multiple configurations by tapping the plus sign again after configuring your first profile.)

step 6: Once there, all you need to do is select the protocol that you wish to use.

setup-vpn-on-android- www.picateshackz.com


step 7: Once you have selected your desired protocol, tap the ‘Save’ option and it will take you back to the main page of the VPN settings screen, and your profile will be available to you on main VPN screen – in our case it’s titled, “Test.”

setup-vpn-on-android- www.picateshackz.com


step 8: Once that is done, click on the profile to enter further details… once you touch it, a pop-up will appear asking for a username, password and any other pertinent details based upon the protocol you chose – the VPN service provider will provide all of that data – and once all of the information is entered correctly you are ready to use your VPN!

setup-vpn-on-android- www.picateshackz.com


Remember! You can always edit or remove the VPN profile by touching the profile you wish to modify or want removed.

How To Setup Free VPN Service On Kali Linux For Anonymity

Setup Free VPN Service On Kali Linux- picateshackz.com

Virtual Private Networks (vpn) create an encrypted ‘tunnel’ between your computer and the host server, with the internet traffic going in and out of the host server. Your ISP or government can only see that you have connected to the VPN server and nothing else – your activities, IP addresses you have visited etc. are all completely hidden from them behind a minimum of 128-bit encryption, So in this tutorial you will be able to know how to setup free VPN service on Kali Linux and how possible is complete anonymity in cyber world.

However, the VPN server can see what you get up to on-line, which is why we feel it vital that a good VPN provider to keeps no logs. Anything less, and its users’ activities may be compromised (thus making the precaution of using a VPN in the first place redundant!).

Although setting up VPN does usually involve downloading and installing a VPN client, or otherwise configuring your computer or mobile device, the computing skills needed are minimal, and most providers supply detailed step-by-step setup guides in any case. One good thing is that once set up, all your internet activity, no matter which program you use, is now safely routed through the VPN.

The best vpns are those that keep no logs. The premise is that if the VPN provider receives a legal request from LE to provide details of who did what and when, they cannot point the finger at a particular user if they have no logs. This is the latest, most reliable (imo) list of such paid VPN providers: http://torrentfreak.com/which-vpn-services-take-your-anonymity-seriously-2014-edition-140315/


Why use VPN?

Here’s 11 reasons why you would want to use VPN services.
  • VPN provides Privacy and cloaks your IP address. 
  • Use any network (public or private or free WiFi) with encryption 
  • Login to your home or Work network from anywhere with confidence. 
  • Bypass censorship and content monitoring. 
  • Browse and bypass Firewall and censorship policy at work or Anywhere! 
  • Access region restricted services from anywhere (i.e. Youtube videos, NetFlix or BBC Player etc.) 
  • Transfer or receive files with privacy. 
  • Hide your voice/VOIP calls. 
  • Use Search Engines while hiding some of your identity. 
  • Hide yourself 
  • Cause you like to be anonymous.
Pros
  • Internet activity cannot be spied on by ISPs or governments
  • High levels of encryption (128-bit to 2048-bit)
  • All internet activity masked (once VPN set up on device)
Cons
  • More expensive than proxies - List of free web proxies
  • Can be a bit slow during peak times
  • If VPN provider keeps logs then these may be obtained by the authorities


Free VPN Services!

The notable negatives to VPN are that it is comparatively pricey, and the encryption process taxes the servers so that when in heavy use internet access through them can slow down noticeably. There are plenty of free vpn providers but i have not found a free VPN who publishes any details about the logs they keep and the circumstances under which they would hand those over to a third party.

Here i am giving you a demonstration of setting up a free vpn service on Kali Linux (Security KISS) but don't expect complete anonymity from this free vpn service.


Let's start the configuration.


Step 1: Enable VPN on Kali Linux

By default , vpn is not configured in Kali Linux. If you want to connect vpn in kali linux , first install pptp and network openvpn in Kali linux using apt-get install. for this login to Kali linux as root user and type the following command in terminal.

 aptitude -r install network-manager-openvpn-gnome network-manager-pptp network-manager-pptp-gnome network-manager-strongswan network-manager-vpnc network-manager-vpnc-gnome


On some cases, you might have to restart network-manager and networking, so type the following command:

 service network-manager restart


Step 2: Enable IP forwarding


Check whether IP forwarding is enabled in Linux:
 cat /proc/sys/net/ipv4/ip_forward
It should return 0 or 1 (Normally it should return 1)


If it is zero (0) you need enable IP forwarding by:

 echo 1 > /proc/sys/net/ipv4/ip_forward
and
 gedit /etc/sysctl.conf

Now the sysctl.conf file will open up then edit the following line 26 and 27: net.ipv4.ip_forward = 1

from

# Uncomment the next line to enable packet forwarding for IPv4
#net.ipv4.ip_forward=1

to

# Uncomment the next line to enable packet forwarding for IPv4
net.ipv4.ip_forward=1

and save.


Step 3: Register on Security KISS (vpn provider)

After successfully done the above two steps now time to register on Security KISS by clicking the following link:
Type your email id then click on create button.


Open your mail and login with given client ID and password to Client Area.


Download the configuration bundle from Client area (Use the download link  generated in SecurityKISS Client Area).


Unzip the files.


Now you have 4 files named client.crtca.crtclient.key and README.txt.

View the README.txt file to find the list of SecurityKISS gateways (In this tutorial i am gonna use the Miami gateway, you can see i am highlighted that in the following screenshot )


Step 4: Configure OpenVPN connection

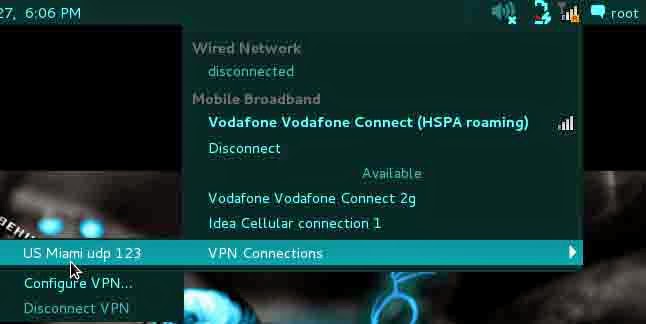
In the network connections find 'Configure VPN'


Select VPN tab and click on Add button.


Choose OpenVPN connection type and press Create button.


Now an editing window will open up, Configure the following information:

  1. Enter connection name indicating server location, protocol and port.
  2. In the Gateway field enter one of the IP address from the list you found in README.txt
  3. Authentication type should be 'Certificates (TLS)'.
  4. Click on User Certificate and navigate to unzipped config file client.crt.
  5. Click on CA Certificate and navigate to unzipped config file ca.crt.
  6. Click on Private Key and navigate to unzipped config file client.key.
  7. Put in your password for your account.


Now click on the Advanced button.

Tick 'Use LZO data compression' and 'Use custom gateway port' check boxes. 

(Enter port number according to the selected server from README.txt.)

If the server you selected from the list is marked as TCP you also need to tick 'Use a TCP connection' and click ok to save settings.


Mark Available to all users then click on save button.

Now you can see the new connection with the gateway name in the network connections manager window (see the following screenshot of mine).


Step 5: Test the tunneled connection

Connect from the VPN connections.
Go to network manager and click to VPN Connections and connect.


You can verify if your IP address has changed by opening their geographical-location website:http://www.securitykiss.com/locate


Successfully connected to the free VPN.


Final Words

VPN provides vastly improved online anonymity, and protects your entire on-line life. In addition to this, because ISPs cannot monitor your online activity, it is an effective means of bypassing ISP throttling. 

VPN is secure, It allows you to bypass proxies, Firewall, monitoring and content filtering. But there’s always that drama when you’re using VPN, it sometime is slow and sometime is not that secure you’d think (Nothing in this world is 100% secure). But for countries like Iran, Pakistan, Egypt, China, North Korea etc. where content filtering is done in National Level maybe it’s a way to get the voice out.


To stay completely anonymous you should first crack a nearby access point so that your initial point of contact with the internet cannot be traced directly to you. For this I would recommend you read: How To Hack Wi-Fi WPA/WPA2 With Kali Linux

For additional anonymity you should them use proxy chains to further obscure your location. For this you should read my previous post: Kali Linux Tutorial: Setting Up ProxyChains + Tor For Anonymity And Security

There is no simple way to achieve anonymity online. Even TOR can be compromised, as the recent darknet busts have shown. If you can carry out the instructions in the two tutorials above you will be much more difficult to track than most. Hope this helps.