Breaking News
Loading...
Showing posts with label HTML DESIGN. Show all posts

Saturday, 26 March 2016

Create a Simple Fiery Text Effect in Photoshop

I’ll show, how to make this fiery text effect like in the hollywood posters. I’ll show how to transform stock images and how to play with blending options in Adobe Photoshop. You will learn, how to make simply background with gradient and grunge effect.

What you’ll be creating

You will create simply fiery text effect. You will start with making really hot shape of desired text, then You will add some stock images and You will create burning text effect. You will need Adobe Photoshop CS5  or newer.
final-results

Tutorial Resources

Step 1

Create new file, 1280×1024 size. Choose File > New (Ctrl + N).
step-001

Tutorial Resources

Step 1

Create new file, 1280×1024 size. Choose File > New (Ctrl + N).
step-001

Step 2

Place “texture-318913” stock to your file. Choose File > Place, select “texture-318913”, and transform it, then click Place.
step-002

Step 3

Create new adjustment layer (Layer > New Adjustment Layer > Brightness/Contrast) or use shortcut. Set Brightness to -125 and Contrast to -11. Click this layer with right mouse button and choose “Create Clipping Mask”.
step-003

Step 4

Create new adjustment layer (Layer > New Adjustment Layer > Levels or use shortcut). Set middle level to 0,52. Click this layer with right mouse button and choose “Create Clipping Mask”.
step-004

Step 5

Create new adjustment layer (Layer > New Adjustment Layer > Color Balance or use shortcut).
Set Shadows:
Cyan-Red +13
Magenta-Green -3
Yellow-Blue -13
Midtones:
Cyan-Red +34
Magenta-Green 0
Yellow-Blue -36
Highlights:
Cyan-Red +20
Magenta-Green 0
Yellow-Blue -37.
Click this layer with right mouse button and choose “Create Clipping Mask”.
step-005

Step 6

Click white canvas next to this layer (layer mask). Choose Gradient Tool (G) and pick radial gradient. Use black and white gradient in the layer mask:
step-006

Step 7

Duplicate “Color balance” layer. Drag it and drop to the Create a New Layer button or go to Layer > Duplicate layer. Decrease its opacity to 50%.
step-007

Step 8

Use Type tool and type your text. Use Trajan Pro 3 Bold font, 238,5 px. Use #ff6c24 color. Duplicate this text layer (Layer > Duplicate layer), then disable it.
step-008

Step 9

Click created text with right mouse button. Choose “Blending options…”. Choose “Inner glow”. Set blending mode to Screen, use #ffa024 color. Set elements size to 10px.
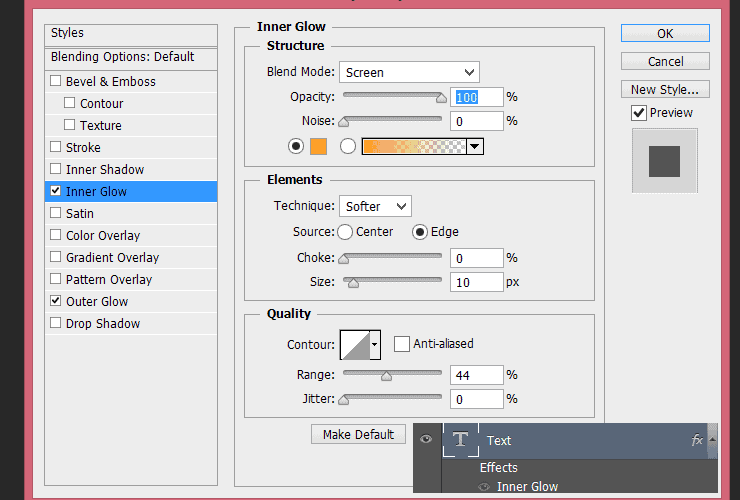
step-009

Step 10

Choose “Outer glow” and set its opacity to 36%. Change color of glow to #ff6c24. Set Elements size to 9px.
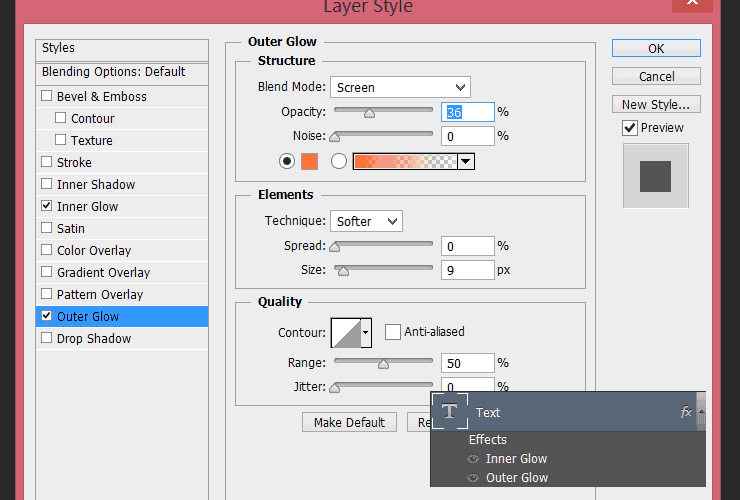
step-010

Step 11

Choose text layer. In layer box set fill to 0%.
step-011

Step 12

Below text layer, add new adjustment layer with solid color (Layer > New Fill Layer > Solid color), set #000 color.
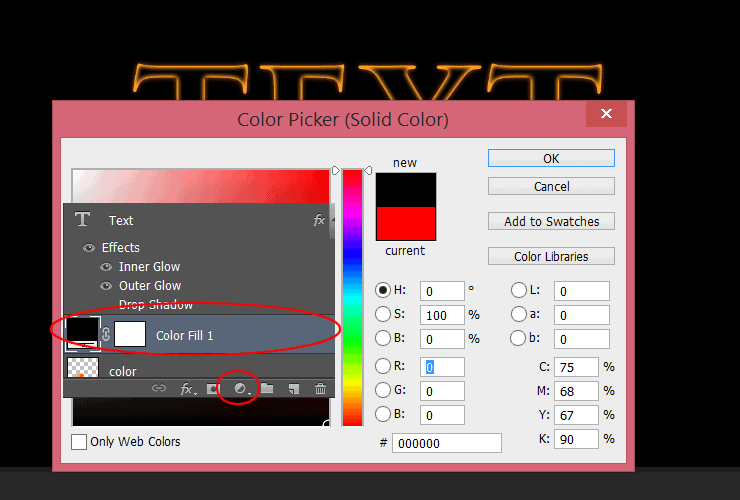
step-012

Step 13

Select “Text” layer and “Solid Color” layer (Ctrl-click (Windows) or Command-click (Mac OS) them). Then click one of selected layers with right mouse button and choose “Convert to Smart Object”.
step-013

Step 14

Now choose Filter > Filter gallery… >. Choose Distort > Glass. Set Distortion to 6, Smoothness to 8. Use “Frosted” texture.

Step 15

Change blending mode to Screen.
step-015

Step 16

Duplicate this layer (Layer > Duplicate layer)..
step-016

Step 17

This step is optional. You’ll create bigger glow of your text. Duplicate “Text copy” layer, which You created in step 8. Drag it to the top of layers. Disable “Inner glow” and “Outer glow” (click an eye symbol).
step-017

Step 18

Then, click this layer with right mouse button. Choose “Blending options…”. Choose “Color overlay”, set #5f2409 color and change blending mode of overlay to Screen.
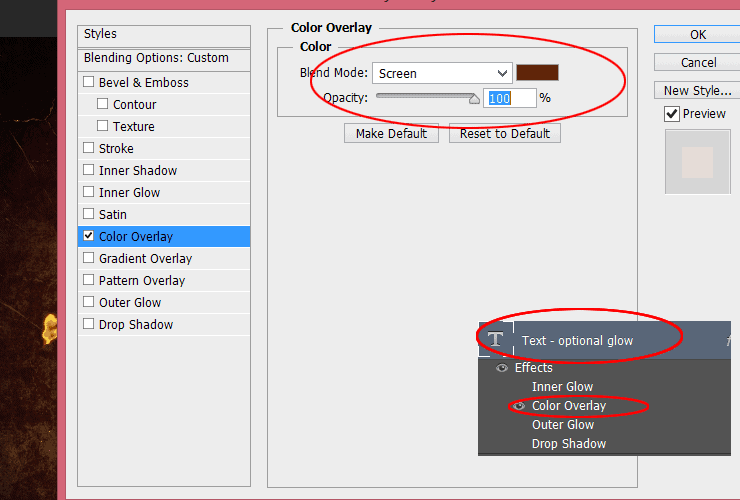
step-018

Step 19

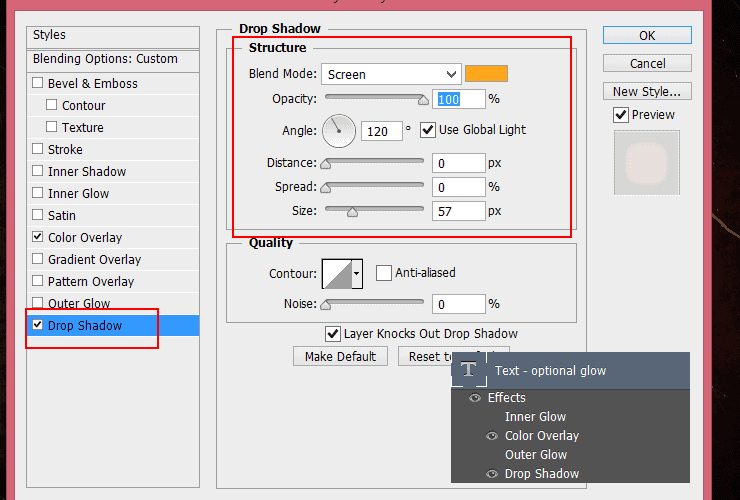
Choose “Drop Shadow”. Change Structure blending mode to “Screen”, set color to #ffa71c, change its size to 57%.
step-019

Step 20

Now it’s the most boring part. You’ll create fiery shape. Place “Flames0027_1_M” to your file and transform it by using warp mode.
step-020

Step 21

Change blending mode to Screen.
step-021

Step 22

Place “Flames0027_10_M” to your file. Use warp mode and change blending mode to “Lighter Color”.
step-022

Step 23

lace “Flames0027_1_M”, use warp mode and change blending mode to “Screen”.
step-023

Step 24

Now “E” letter. Place “Flames0027_1_M”, apply transform and change blending mode to “Screen”.
step-024

Step 25

Duplicate this layer and transform (Ctrl + T) it.
step-025

Step 26

Place “Flames0027_10_M” to your file. Use warp mode and change blending mode to “Screen”.
step-026

Step 27

Place “Flames0027_12_M” to your file. Transform (Ctrl + T) it and change blending mode to “Screen”.
step-027

Step 28

Now “X” letter. Place “Flames0027_12_M” to your file. Use warp mode and change blending mode to “Screen”.
step-028

Step 29

Place “Flames0027_1_M”, use warp mode and change blending mode to “Screen”.

Step 30

Duplicate fiery layers with “T” letter. Select layers by holding down Ctrl (Windows) or Command (Mac OS). Drag it and drop to the Create a New Layer button. Drag duplicated layers to the top.
step-030

Step 31

Transform layers (ctrl+T). You are done! :)
step-031

Final Results

final-results

Download the PSD

Download

Fiery Text Effect.zip | 9.75 MB

Tutorial by computerinfotechwrld

Friday, 9 October 2015

Editing a webpage in Google Chrome

Editing a webpage in Google Chrome


       What if I told you that you could edit any webpage or website on the internet right from your home computer without any special software or insane computer programming skills? It's easy! The only thing that you need to make this trick work is the popular web browser Google Chrome. This trick will allow you to change the appearance of any webpage on your local machine. This means that it is localized; only you can see this, as it is only affecting the static page on your machine. It is also temporary. Once you refresh, reload, whatever, the changes you made will be lost. However, this is still a fun and potentially useful trick.

Sorry in advance if the picture quality is not desirable, the screenshots that I took were not high quality.

Step 1: Use the Developer Tools

In Google Chrome, there is a feature known as 'Developer Tools'. This is similar to an onscreen view of the webpages' source code, except that it is in some ways dynamic. You can change the code that you see, and the webpage will respond accordingly. So, how do we access this magical feature? Simple. On your keyboard, press

       Ctrl + Shift + I

Mind you, that is an uppercase i (I), not a lowercase l (L). If you prefer to access this feature without your keyboard, or don't want to try and remember the keyboard shortcut, never fear. Simply press on the Tools button in the upper right-hand corner. It will either look like a wrench, or a series of three lines on top of each other. Once there, hover over the menu item labeled Tools, about halfway down the menu. There will be another menu that appears. Near the bottom is an item labeled Developer Tools. Click on it. Now you have access to Chrome's dynamic source editor. To edit HTML/CSS, navigate to the tab marked Elements. To use the JavaScript Console, select the tab marked Console.

How to Make HTML Image Slideshow without Programming?

How to Make HTML Image Slideshow without Programming?


Recently, I have noticed that many users want to make HTML image slideshow but don’t know how to do this. In this tutorial, I will help these users to understand how to make HTML image slideshow with the help of SliceMaker products.

Step 1: Step 1: Import One of the Images You Prepared into SliceMaker Products.

Step 2: Step 2: Give a Name to the HTML Image Slideshow You Want to Make

Step 3: Step 3: Create a Slice to Contain the Image.

Step 4: Step 4: Select the Slice and then Set it as Image Switching Effect.

Note: After selecting the slice, you just need to tick the box (like the picture shown below) to tell the software you will set the slice as image switching effect.

Step 5: Step 5: Choose a Style for Your HTML Image Slideshow.


Step 6: Step 6: Add the Images You Prepared.

Step 7: Step 7: Select a File Folder to Save the HTML Image Slideshow

Note: The prepared 3 images should be saved to the File Folder firstly before we doing the above settings.

Step 8: Step 8: Generate and Preview.


After generating, please also click the “Browse” button to find the generated HTML image slideshow and then open it with a web browser like Firefox to view it. You will see that it is perfect!     

Monday, 28 September 2015

Create Your websites with HTML (HTML Introduction)

Create Your websites with HTML (HTML Introduction)


From now, i will try to write about HTML (Hyper Text Markup Language). If you follow my post, you will learn how to make a website. We offer free tutorials in HTML-5. HTML is easy to learn So create your own Web site with HTML-5 and enjoy it.

   
    What is HTML?

HTML means Hyper Text Markup Language.
HTML is a web pages describing language.
HTML is not a programming language, it is a markup language. HTML is a set of markup tags and markup tags used to describe web pages.
HTML tags(HTML markup tags) normally come in pairs like <b> and </b>.
Here <b> called start tag(Opening tag) and </b> called end tag(Closing tag).
The browser does not display the HTML tags, but the tags uses to interpret the content of the page.
   
    Necessary equipment:
    
1. Notepad or Dreamweaver or Notepad++ or etc
2. Internet explorer or Mozilla Firefox or Google chrome or etc.

Write your HTML code in notepad & save any name with .html or .htm extension such as file name.htm or index.html And open this file with any web browser. you can use either the .htm or the .html file extension. There is no difference. 

Basic structure of HTML

Basic structure of HTML


           Structure: 
<html>
    <head> Here you use CSS, jS Style Sheet tags.
        <title>Here use your website title</title>
    </head>
    <body>
        Here use main content of your page, you use this ppart to design your page. Normaly your page design start from here.
    </body>
<html>


    Try this Example:


Open your notepad & type  this(in below) code then go to file menu & click to "save as"  then set "File Name: index.html" & "Save as type: all files" and open this file with any web browser.
     
<html>
    <head>
        <title>Basic structure of HTML</title>
    </head>
    <body>
        This is my first web page. I am learning now HTML.
    </body>
</html>
     
    Code Analysis:
     
The text between <html> & </html> is describes the total web page.
The text between <body> & </body> is the contains page content.