


Create a Simple Fiery Text Effect in Photoshop

I’ll show, how to make this fiery text effect like in the hollywood posters. I’ll show how to transform stock images and how to play with blending options in Adobe Photoshop. You will learn, how to make simply background with gradient and grunge effect.
What you’ll be creating
You will create simply fiery text effect. You will start with making really hot shape of desired text, then You will add some stock images and You will create burning text effect. You will need Adobe Photoshop CS5 or newer.
Tutorial Resources
- Image 1, Image 10, Image 12 in medium sizes – cgtextures
- Texture grunge vignette – Pixabay
- TrajanPro – font – fontplace.com
Step 1
Create new file, 1280×1024 size. Choose File > New (Ctrl + N).

Tutorial Resources
- Image 1, Image 10, Image 12 in medium sizes – cgtextures
- Texture grunge vignette – Pixabay
- TrajanPro – font – fontplace.com
Step 1
Create new file, 1280×1024 size. Choose File > New (Ctrl + N).
Step 2
Place “texture-318913” stock to your file. Choose File > Place, select “texture-318913”, and transform it, then click Place.

Step 3
Create new adjustment layer (Layer > New Adjustment Layer > Brightness/Contrast) or use shortcut. Set Brightness to -125 and Contrast to -11. Click this layer with right mouse button and choose “Create Clipping Mask”.

Step 4
Create new adjustment layer (Layer > New Adjustment Layer > Levels or use shortcut). Set middle level to 0,52. Click this layer with right mouse button and choose “Create Clipping Mask”.

Step 5
Create new adjustment layer (Layer > New Adjustment Layer > Color Balance or use shortcut).
Set Shadows:
Cyan-Red +13
Magenta-Green -3
Yellow-Blue -13
Cyan-Red +13
Magenta-Green -3
Yellow-Blue -13
Midtones:
Cyan-Red +34
Magenta-Green 0
Yellow-Blue -36
Cyan-Red +34
Magenta-Green 0
Yellow-Blue -36
Highlights:
Cyan-Red +20
Magenta-Green 0
Yellow-Blue -37.
Click this layer with right mouse button and choose “Create Clipping Mask”.
Cyan-Red +20
Magenta-Green 0
Yellow-Blue -37.
Click this layer with right mouse button and choose “Create Clipping Mask”.

Step 6
Click white canvas next to this layer (layer mask). Choose Gradient Tool (G) and pick radial gradient. Use black and white gradient in the layer mask:

Step 7
Duplicate “Color balance” layer. Drag it and drop to the Create a New Layer button or go to Layer > Duplicate layer. Decrease its opacity to 50%.

Step 8
Use Type tool and type your text. Use Trajan Pro 3 Bold font, 238,5 px. Use #ff6c24 color. Duplicate this text layer (Layer > Duplicate layer), then disable it.

Step 9
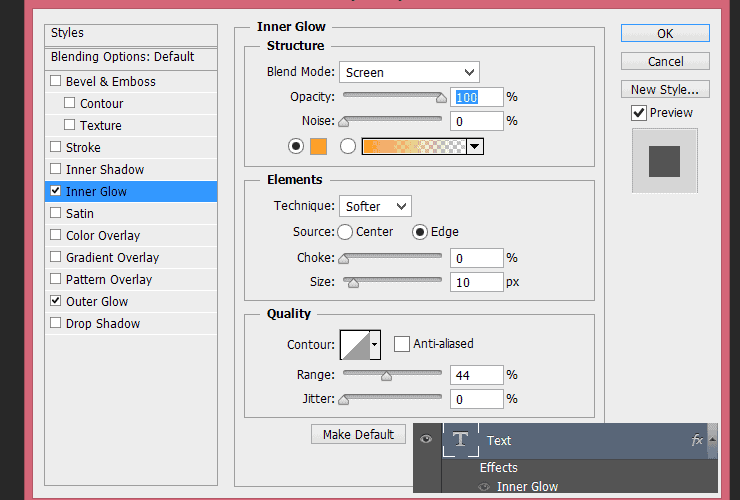
Click created text with right mouse button. Choose “Blending options…”. Choose “Inner glow”. Set blending mode to Screen, use #ffa024 color. Set elements size to 10px.
Step 10
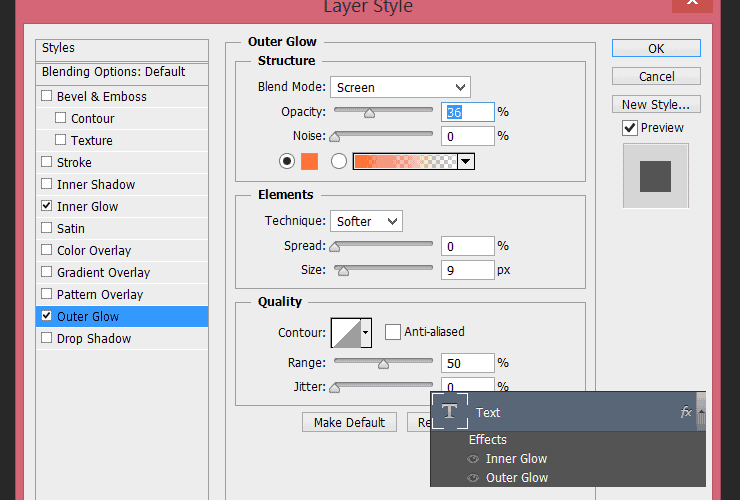
Choose “Outer glow” and set its opacity to 36%. Change color of glow to #ff6c24. Set Elements size to 9px.
Step 11
Choose text layer. In layer box set fill to 0%.

Step 12
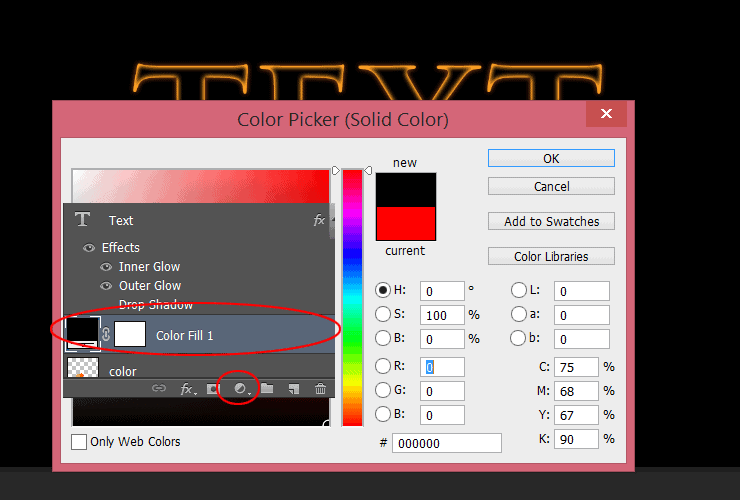
Below text layer, add new adjustment layer with solid color (Layer > New Fill Layer > Solid color), set #000 color.
Step 13
Select “Text” layer and “Solid Color” layer (Ctrl-click (Windows) or Command-click (Mac OS) them). Then click one of selected layers with right mouse button and choose “Convert to Smart Object”.

Step 14
Now choose Filter > Filter gallery… >. Choose Distort > Glass. Set Distortion to 6, Smoothness to 8. Use “Frosted” texture.
Step 15
Change blending mode to Screen.

Step 16
Duplicate this layer (Layer > Duplicate layer)..

Step 17
This step is optional. You’ll create bigger glow of your text. Duplicate “Text copy” layer, which You created in step 8. Drag it to the top of layers. Disable “Inner glow” and “Outer glow” (click an eye symbol).

Step 18
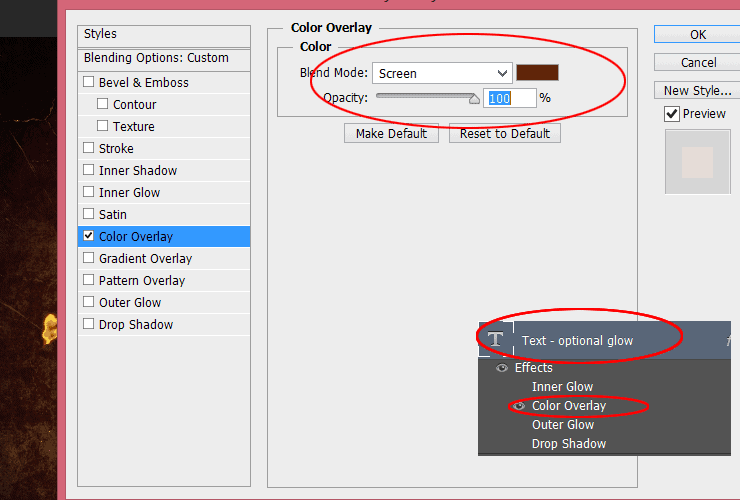
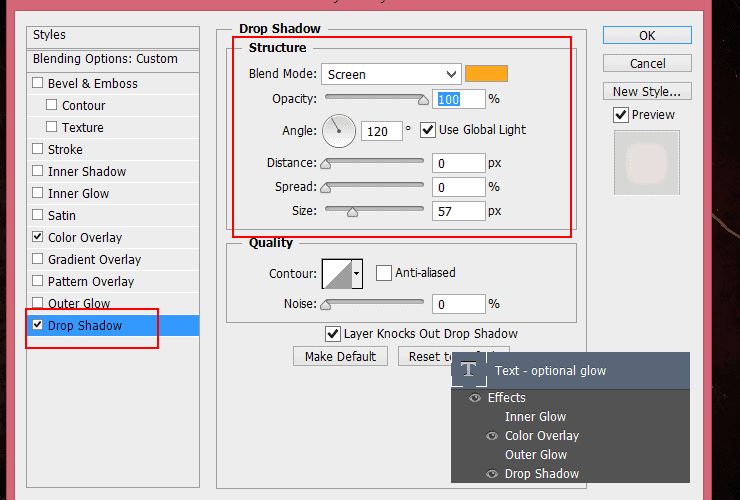
Then, click this layer with right mouse button. Choose “Blending options…”. Choose “Color overlay”, set #5f2409 color and change blending mode of overlay to Screen.
Step 19
Choose “Drop Shadow”. Change Structure blending mode to “Screen”, set color to #ffa71c, change its size to 57%.
Step 20
Now it’s the most boring part. You’ll create fiery shape. Place “Flames0027_1_M” to your file and transform it by using warp mode.

Step 21
Change blending mode to Screen.

Step 22
Place “Flames0027_10_M” to your file. Use warp mode and change blending mode to “Lighter Color”.

Step 23
lace “Flames0027_1_M”, use warp mode and change blending mode to “Screen”.

Step 24
Now “E” letter. Place “Flames0027_1_M”, apply transform and change blending mode to “Screen”.

Step 25
Duplicate this layer and transform (Ctrl + T) it.

Step 26
Place “Flames0027_10_M” to your file. Use warp mode and change blending mode to “Screen”.

Step 27
Place “Flames0027_12_M” to your file. Transform (Ctrl + T) it and change blending mode to “Screen”.

Step 28
Now “X” letter. Place “Flames0027_12_M” to your file. Use warp mode and change blending mode to “Screen”.

Step 29
Place “Flames0027_1_M”, use warp mode and change blending mode to “Screen”.
Step 30
Duplicate fiery layers with “T” letter. Select layers by holding down Ctrl (Windows) or Command (Mac OS). Drag it and drop to the Create a New Layer button. Drag duplicated layers to the top.

Step 31
Transform layers (ctrl+T). You are done! :)

Final Results


