Breaking News
Loading...

Thursday 15 October 2015

DISABLE COPY AND PASTE FUNCTION


This is very annoying when you find someone is copying your writings.Now question arise how to protect your blogger website from stealing your writings.now i share a tricks how can you save your blogger site from being copy paste.i mentioned a HTML code it will protect your only blogger site from copy paste


Go dashboard > design tab


Click edit HTML


Press CTRL+F then find the code
<head>
Just easily paste the following code just before < / head >
<!-- Disable Copy and Paste-->
<script language='JavaScript1.2'>
function disableselect(e){
return false
}
function reEnable(){
return true
}
document.onselectstart=new Function (&quot;return false&quot;)
if (window.sidebar){
document.onmousedown=disableselect
document.onclick=reEnable
}
</script>
Now save the template congratulation now your blogger site is completely copy paste protected.Remember this code is secure and it does not harm your SEO

Best free 2D animation softwares and cartoon creator

Best free 2D animation software's and cartoon creatorBest free 2D animation softwares and cartoon creator

We have listed out some free graphic designing softwares and free image editing softwaresand today in our free lists we are going to share some best free 2D animation softwares and cartoon creator. All these softwares mentioned below are very simple to use and you can find more tutorials online.

Pencil

Pencil is a free easy to use animation and drawing software alternative to Toon Boom in which you can create hand-drawn cartoon images and animate it. It features both vector and bitmap graphics and here are some cool things you can do with Pencil.
  1. Import background or draw backgrounds manually
  2. Copy, paste new frame with previous image
  3. Create several layers for animated objects and characters
  4. Add audio for you animation and export project in .FLV format.
Platform – Pencil is an open source cross platform that runs on Windows, Mac OS X and Linux.
Best free 2D animation softwares and cartoon creator

Synfig Studio

Synfig studio is a free yet advanced and powerful drawing and animation software. It can able to produce quality animations like you see in feature films. Some of the features of Synfig Studio are
  1. It supports large number and various types of layers like geometric, filters, gradients, transformations, distortions, fractal and more.
  2. Layers are parametrically generated and most of the elements are vector based.
Platform – Synfig studio is open source software runs on Windows, Mac OS X and Linux.
Best free 2D animation softwares and cartoon creator

Tupi

Tupi is a 2D animation software and cartoon creator. Since it has a user friendly interface even an 8 year old kid can handle this software. Tupi features everything like pencil in which you can add audio and export to verity of formats, tween objects so you don’t have to draw manually. Tupi works great with vector.
Platform – Tupi is open source software and runs only on Linux.
Best free 2D animation softwares and cartoon creator

Scratch

Scratch is science and educational software that helps kids to learn some programming skills. With Scratch you can create games, stories and animation that have easy drag and drop interface. You can create images and choose animation effects when mouse hovers and moreover easily share all your animation via web.
Platform – Scratch is an open source software that runs on Windows, Mac OS X and Linux
Best free 2d animation softwares and cartoon creator
Hope you found this list of best free 2D animation softwares and cartoon creator to be useful. Please comment, share and subscribe to get more free lists.

How to add custom favicon in Blogger – Change default Blogger favicon

How to add custom favicon in Blogger – Change default Blogger favicon

Have you ever thought of removing that big B icon and adding your logo in your Blogger blog?  This post is for those who wish or willing to have their logo to be displayed in where the big B holds its place. You might see this icon in many sites next above to your browsers address bar, they are called favicon.
For example take a look at this site displaying logo as a favicon and mostly many sites display their logo as favicon. Before knowing how to add custom favicon in Blogger let’s see what favicon is and why to add favicon in a nutshell.
How to change favicon in Blogger - adding custom favicon
What is favicon? Favicon is a short form of favorite icon and it is known as website icon, tab icon or URL icon with 16 X 16 pixels related to that website.
Why to add Favicon? Be like a pro and blog like a pro. In order to show your blogs identity and uniqueness you need to remove that default Blogger icon and add your custom favicon.

How to add custom Favicon in Blogger

Adding custom favicon in Blogger is too easy. In order to change default Blogger favicon all you need is a ready made favicon of yours. You might have already created a logo for your blog. Now Go to favicon.cc and create a favicon and download the icon file.
How to add custom favicon in Blogger
Now login to your Blogger dashboard and go to layout settings. At the top right corner you will see favicon widget, open it to change the Blogger favicon. Upload your favicon and save it.
how to change favicon in Blogger
That’s it now try refreshing your blog and you will see your favicon instead of Blogger favicon.
Note: For best results keep the dimensions in favicon.cc and never upload jpeg, PNG files for favicon.

How to remove “powered by Blogger” attribution in new HTML editor

How to remove “powered by Blogger” attribution in new HTML editor
As we all know Blogger is a free and widely used blogging platform and we are providing more tips and tricks for beginners. Here we will see about a simple trick on how to remove “powered by Blogger” attribution from your Blogger blog. People who are using Blogger platform will have this powered by Blogger attribution below their blog. It comes by default in every template and it is an official representation for Blogger. Removing powered by Blogger attribution is simple. Just follow this step by step tutorial on how to remove powered by Blogger attribution using new HTML editor.

How to remove powered by Blogger attribution

  1. Go to Blogger.com and login to your Blogger profile
  2. Select  your blog that you wish to remove this attribute
  3. Now go to template and click edit HTMLHow to remove powered by Blogger attribute
  4. Here drop-down “jump to widget” option and from that list select Attribution1 as highlighted belowhow to remove powered by Blogger attribution
  5. Now in the editor press ctrl + F and find for this line <b:widget id=’Attribution1′ locked=’true’ title=” type=’Attribution’>How to remove powered by Blogger attribution
  6. Now replace the locked=’true’ in to locked=’false’ as you can see highlighted belowHow to remove powered by Blogger attribution
  7. Once done click save template
  8. Now go to layout option and at the below you can see attribution gadget, click edit.
  9. In that popup window click remove and you are doneHow to remove powered by Blogger attribution
Now go and view your site where you won’t see the “powered by Blogger” attribution.
Your copyright text is also removed along with powered by Blogger attribution. To add copyright text just click add a gadget in layout settings select HTML/JavaScript, add your copyright text and drag and drop it below. Removing this powered by Blogger attribution adds uniqueness to your blog and it shows your professionalism. Hope this helped you on how to remove powered by Blogger attribution using new HTML editor. Now learn how to add custom favicon to your Blogger blog.


Wednesday 14 October 2015

Add Animated Ramadan Lantern Widget/Ramadan Hanging Light to Blogger?

Add Animated Ramadan Lantern Widget/Ramadan Hanging Light to Blogger?

 This animated hanging light created in flash so your browser should support Flash Player,Otherwise you have to install Flash Player. In newer Operating Systems (Windows 7, Windows 8) Flash Player already installed it.Flash Animated Ramadan Lantern in top of our blog,you can see a hanging Lantern spinning to left to right then also back with a glowing Ramadan Kareem in background. This Ramadan Lantern looks very nice in Dark backgrounds,Blue,Orange Backgrounds.
You can see the demo in top of our Blog

How To Add Animated Ramadan Lantern ?

  • Sign In to Blogger Dashboard
  • Go to Template -> Edit HTML
  • Find (Ctrl+F) </body>
  • Copy the Following code just above it
 <!--  Ramadan Lantern www.netoopsblog.com -->
<div align='center'>
<table border='0' cellpadding='0' cellspacing='0' width='900'>
<tr>
<td height='0' width='900'>
<div style='float:top right; position:absolute; overflow:visible; left:45px; top:0px; height:192px; width:144px z-index: 9999;'><a href="http://www.www.netoopsblog.com"></a><object border='0' classid='clsid:D27CDB6E-AE6D-11CF-96B8-444553540000' codebase='http://download.macromedia.com/pub/shockwave/cabs/flash/swflash.cab#version=6,0,40,0' height='144' id='obj2' width='192'><param name='movie' value='http://netoopscodes.googlecode.com/svn/branches/swf/ramzan-hanging-lanterns.swf'/><param name='quality' value='High'/><param name='wmode' value='transparent'/><embed height='144' name='obj2' pluginspage='http://www.macromedia.com/go/getflashplayer' quality='High' src='http://netoopscodes.googlecode.com/svn/branches/swf/ramzan-hanging-lanterns.swf' type='application/x-shockwave-flash' width='192' wmode='transparent'/></object>
</div>
</td>
</tr>
</table>
</div>
<!--  Ramadan Lantern By www.netoopsblog.com -->
Click on  Save. It's done. Check your Blog

Awesome NetOopsblog Subscription Widget for blogger

Awesome NetOopsblog Subscription Widget for blogger

NetOopsblog Subscription box Blogger
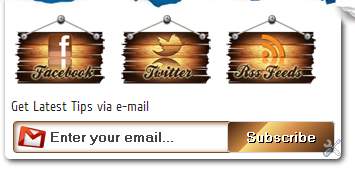
This post is about how to add a Subscription Box like our NetOops blog. Subscription box contains Facebook, Twitter, RSS Feed, e-mail subscription. This widget is based on a wooden theme. Facebook, Twitter, RSS Feed links are shown as Natural Wooden Sticky Boards. In this tutorial i am adding a new e-mail subscription box with wooden theme.


Demo is in the Right of this Blog

What's inside this article??

Subscription Box With Fully Wooden Theme

  • Go to Blogger Dashboard
  • Go to Layout 
  • Select Add a Gadget
  • You can type title any
  • And Copy the following code in the content.
Demo of Fully Wooden Theme

 Important: If you don't want Mouse over effect of Images in the Subscription box, please delete the REDhighlighted code,. If you want then leave it there.
    <style type="text/css">
     /* Delete form Here*/  
    img.beintouch:hover {
        background: none repeat scroll 0 0 #D6D6D6;
        border-radius: 16px 16px 16px 16px;
        box-shadow: 0 0 10px #565656;
    }
    /* Delete to Here*/
    .emailtext {
        background: url("https://blogger.googleusercontent.com/img/b/R29vZ2xl/AVvXsEgpm-2BUmGs4LpmDKSp1v51aXMNinrQyT4PZ_QS2DLprgX8-ryqO1x-ur8lc2bVbe-OCNm9-POxFkIwQwibQtuN6X4e0OuPIYkVTWgP7b8mkF6lyrXLqT5vNKPhYuJ_PKep6-AhJNYGWxg/s1600/mailbox.png") no-repeat scroll 4px center transparent;
        border: 1px solid #7E4E27;
        border-radius: 4px 4px 4px 4px;
        box-shadow: 1px 1px 4px #7E4E27 inset;
        color: #444444;
        font-weight: bold;
        margin-left: 2px;
        padding: 7px 15px 7px 35px;
        text-decoration: none;
        width: 176px;
    }
    .ebutton {
        background: -moz-linear-gradient(-45deg, #3C1F0E 0%, #D28A47 30%, #F9E183 30%, #D28A47 55%, #3C1F0E 100%) repeat scroll 0 0 transparent;
        border: 1px solid #D3D3D3;
        border-radius: 4px 4px 4px 4px;
        color: #FFFFFF;
        cursor: pointer;
        font-weight: bold;
        margin-left: -18px;
        margin-top: 5px;
        padding: 6px 15px;
        text-decoration: none;
        text-shadow: 1px 1px 0 #000000;
    }
    </style>
    <table align="center" width="317px" cellspacing="0px" cellpadding="1px"><tbody><tr><td><a target="_blank" rel="nofollow" href="http://www.facebook.com/pages/NetOops-Blog/159796530791611"><img src="https://blogger.googleusercontent.com/img/b/R29vZ2xl/AVvXsEgvjhKIYYqHJ4cBqPTQZdKWdy6veFkZO2T4oVEY_KhvAQtbsWgW_8KfjqCTaHMoK7sfjaVShbT3_InIbafhonVLY8keuVQM6KnDZPOl4IEEloSEfuGoRwAHigdZIp9JA0ekVsA8gf2ZUBU/s1600/woden+board+facebook_netoops.png" class="beintouch" /></a></td><td><a target="_blank" href="http://twitter.com/netoopsblog/" rel="nofollow"><img src="https://blogger.googleusercontent.com/img/b/R29vZ2xl/AVvXsEgudvLMtwU_jEjveYlQvKxrffzIXSGqitW5rXdHzOdTrqudvHolAh1hGF7B17hnvB5yKm1lmXOyapMPxOZLfmMj-jJX6TPVzWwD1zMcKJSXRofyltKAaq4ZmpHr8TePoDYkknol6tJXvwU/s1600/woden+board+twitter_netoops.png" class="beintouch" /></a></td><td><a target="_blank" href="http://feeds.feedburner.com/NetOopsBloggerTricks" rel="nofollow"><img src="https://blogger.googleusercontent.com/img/b/R29vZ2xl/AVvXsEjhg_9R0S6U1sOugqvdZUQcy7qcR7PxuZiyp7vmvcxnxwYUW0RRoKlaXpgeCjAVKDf5sibAUQVxlj_qhcbnXLAcBZVay5Z3IjTx56Ic_RZZLXQWTpX9KKrUfP10T_LRLjx739yhyja4m6M/s1600/woden+board+RSS1_netoops.png" class="beintouch" /></a><a href="http://www.netoopsblog.com"></a></td></tr></tbody></table>
    <div>Get Latest Tips via e-mail</div>
    <form target="popupwindow" style="margin: 0pt;" onsubmit="window.open('http://feedburner.google.com/fb/a/mailverify?uri=netoopsbloggertricks', 'popupwindow', 'scrollbars=yes,width=550,height=520');return true" method="post" class="emailform" action="http://feedburner.google.com/fb/a/mailverify">
    <input type="hidden" value="NetOopsBloggerTricks" name="uri" />
    <input type="hidden" value="en_US" name="loc" />
    <input type="text" value="Enter your email..." onfocus="if (this.value == &quot;Enter your email...&quot {this.value = &quot;&quot;}" onblur="if (this.value == &quot;&quot {this.value = &quot;Enter your email...&quot;;}" name="email" class="emailtext" />
    <input type="submit" value="Subscribe" title="" class="ebutton" alt="" />
    </form>


    Change the BLUE highlighted code with FACEBOOK PAGE URL, TWTTER, FEED URL, FEED ID respectively.

    Subscription Box With Default Basic Wooden Theme

    • Go to Layout 
    • Select Add a Gadget
     Important: If you don't want Mouse over effect of Images in the Subscription box, please delete the REDhighlighted code,. If you want then leave it there.
    <style type="text/css">
     /* Delete form Here*/  
    img.beintouch:hover {
        background: none repeat scroll 0 0 #D6D6D6;
        border-radius: 16px 16px 16px 16px;
        box-shadow: 0 0 10px #565656;
    }
    /* Delete to Here*/
    </style>
    <table align="center" width="317px" cellspacing="0px" cellpadding="1px"><tbody><tr><td><a target="_blank" rel="nofollow" href="http://www.facebook.com/pages/NetOops-Blog/159796530791611"><img src="https://blogger.googleusercontent.com/img/b/R29vZ2xl/AVvXsEgvjhKIYYqHJ4cBqPTQZdKWdy6veFkZO2T4oVEY_KhvAQtbsWgW_8KfjqCTaHMoK7sfjaVShbT3_InIbafhonVLY8keuVQM6KnDZPOl4IEEloSEfuGoRwAHigdZIp9JA0ekVsA8gf2ZUBU/s1600/woden+board+facebook_netoops.png" class="beintouch" /></a></td><td><a target="_blank" href="http://twitter.com/netoopsblog/" rel="nofollow"><img src="https://blogger.googleusercontent.com/img/b/R29vZ2xl/AVvXsEgudvLMtwU_jEjveYlQvKxrffzIXSGqitW5rXdHzOdTrqudvHolAh1hGF7B17hnvB5yKm1lmXOyapMPxOZLfmMj-jJX6TPVzWwD1zMcKJSXRofyltKAaq4ZmpHr8TePoDYkknol6tJXvwU/s1600/woden+board+twitter_netoops.png" class="beintouch" /></a></td><td><a target="_blank" href="http://feeds.feedburner.com/NetOopsBloggerTricks" rel="nofollow"><img src="https://blogger.googleusercontent.com/img/b/R29vZ2xl/AVvXsEjhg_9R0S6U1sOugqvdZUQcy7qcR7PxuZiyp7vmvcxnxwYUW0RRoKlaXpgeCjAVKDf5sibAUQVxlj_qhcbnXLAcBZVay5Z3IjTx56Ic_RZZLXQWTpX9KKrUfP10T_LRLjx739yhyja4m6M/s1600/woden+board+RSS1_netoops.png" class="beintouch" /></a><a href="http://www.netoopsblog.com"></a></td></tr></tbody></table>
    <div>Get Latest Tips via e-mail</div>
    <form target="popupwindow" style="margin: 0pt;" onsubmit="window.open('http://feedburner.google.com/fb/a/mailverify?uri=netoopsbloggertricks', 'popupwindow', 'scrollbars=yes,width=550,height=520');return true" method="post" class="emailform" action="http://feedburner.google.com/fb/a/mailverify">
    <input type="hidden" value="NetOopsBloggerTricks" name="uri" />
    <input type="hidden" value="en_US" name="loc" />
    <input type="text" value="Enter your email..." onfocus="if (this.value == &quot;Enter your email...&quot{this.value = &quot;&quot;}" onblur="if (this.value == &quot;&quot {this.value = &quot;Enter your email...&quot;;}" name="email" class="emailtext" />
    <input type="submit" value="Subscribe" title="" class="ebutton" alt="" />
    </form>


    Change the BLUE highlighted code with FACEBOOK PAGE URL, TWTTER, FEED URL, FEED ID respectively.

    I think this widget helps you, Please share and like...

    Beautiful Page Navigation for Blogger Blog [new script]

    Beautiful Page Navigation for Blogger Blog [new script]


    page navigation for blogger
    Blogger Page Navigation is an awesome trick to navigate your Blogger Blog Pages.It allows your users to Navigate Blog pages like Book,By using this your blog visitors can easily go to an appropriate page.By default Blogger allows Older Posts and Newer Posts link to Navigate between Blog pages.It is very difficult for your users to navigate deeper into your Blog's Posts, so the Page Navigation helps us to solve this problem.
     Let's see how to install it.Follow the steps below.

    1.How To Install Page Navigation Widget

    • Log In to your Blogger Account
    • Go to Design-> Page Elements(Shown in the Picture)
    • In New Blogger Template Go to Layout -> Add Gadget
    • Click on Add Gadget (anyone) and look for HTML/Javascript take it.
    • Leave the Title as Blank(as shown in the figure)
    • Copy and paste the below code in it.
    <style type='text/css'>
    #blog-pager{height: 28px;
        padding: 10px 0 0;
    overflow:hidden;
    text-align:center;
    }
    .showpageArea a {text-decoration:underline;
    font-size: 16px;
           text-align: center;}
    .showpageNum a {font-size:16px;text-decoration:none;border: 1px solid #cccccc;margin:0 5px;padding:5px;}
    .showpageNum a:hover {border: 1px solid #cccccc;background-color:#cccccc;}

    .showpagePoint {font-size:16px;text-decoration:none;border: 1px solid #cccccc;background: #216FD9;margin:0 5px;padding:5px;color:#ffffff;}

    .showpageOf {text-decoration:none;padding:5px;margin: 0 5px;}
    .showpage a {text-decoration:none;border: 1px solid #cccccc;padding:5px;}
    .showpage a:hover {text-decoration:none;background: #cccccc;}
    .showpageNum a:link,.showpage a:link {text-decoration:none;color:#333333;}</style>
    <script style='text/javascript'>var pageCount=7; 
    var displayPageNum=5;var upPageWord="Previous";var downPageWord="Next";</script><a href="http://www.netoopsblog.com" style="font-size:0pt">Blogger Widgets</a>
    <script style='text/javascript' src='http://netoopscodes.googlecode.com/svn/netoops-page-nav-v2.js'></script>
    you can change Red Highlighted texts when you need. pageCount=7;  determines how many Blog posts in each pages. you want to display in each pages.(Note:if you change this value '7' goto Settings->Formatting and change value of Show at most as you given in PageCount)
    And displayPageNum=5 determines how many additional Page Navigation numbers display on the page.
    • Click on save,You are almost clear.
    • Then Change the position of the Widget ,place under the Blog posts.(shown in the figure)
    •  
    • Done..your blog had a page navigation bar.

    Awesome Rainbow animation Link Widget for Blogger

    Awesome Rainbow animation Link Widget for Blogger

    This is a simple Blogger Blog Trick,Changing the color of Link when Mouse over it.7 colors are changing like animation when hover the link.
    Follow the simple steps below..


    If you are a beginner in HTML editing,Use our 1 Click Widget Below(Click Add to Blogger Button below)


    Install Rainbow Animation Hover Effect Manually.

    Note:Remember that Back up your Template First.(How to Backup Template)

    • Sign In to you Blogger Account.
    • Go to Design->Edit HTML
    • Find <head> section and Place the below code inside it.

    <script type='text/javascript'>
    //<![CDATA[
    var rate = 20;
    if (document.getElementById)
    window.onerror=new Function("return true")
    var objActive;  // The object which event occured in
    var act = 0;    // Flag during the action
    var elmH = 0;   // Hue
    var elmS = 128; // Saturation
    var elmV = 255; // Value
    var clrOrg;     // A color before the change
    var TimerID;    // Timer ID
    if (document.all) {
    document.onmouseover = doRainbowAnchor;
    document.onmouseout = stopRainbowAnchor;
    }
    else if (document.getElementById) {
    document.captureEvents(Event.MOUSEOVER | Event.MOUSEOUT);
    document.onmouseover = Mozilla_doRainbowAnchor;
    document.onmouseout = Mozilla_stopRainbowAnchor;
    }
    function doRainbow(obj)
    {
    if (act == 0) {
    act = 1;
    if (obj)
    objActive = obj;
    else
    objActive = event.srcElement;
    clrOrg = objActive.style.color;
    TimerID = setInterval("ChangeColor()",100);
    }
    }
    function stopRainbow()
    {
    if (act) {
    objActive.style.color = clrOrg;
    clearInterval(TimerID);
    act = 0;
    }
    }
    function doRainbowAnchor()
    {
    if (act == 0) {
    var obj = event.srcElement;
    while (obj.tagName != 'A' && obj.tagName != 'BODY') {
    obj = obj.parentElement;
    if (obj.tagName == 'A' || obj.tagName == 'BODY')
    break;
    }
    if (obj.tagName == 'A' && obj.href != '') {
    objActive = obj;
    act = 1;
    clrOrg = objActive.style.color;
    TimerID = setInterval("ChangeColor()",100);
    }
    }
    }
    function stopRainbowAnchor()
    {
    if (act) {
    if (objActive.tagName == 'A') {
    objActive.style.color = clrOrg;
    clearInterval(TimerID);
    act = 0;
    }
    }
    }
    function Mozilla_doRainbowAnchor(e)
    {
    if (act == 0) {
    obj = e.target;
    while (obj.nodeName != 'A' && obj.nodeName != 'BODY') {
    obj = obj.parentNode;
    if (obj.nodeName == 'A' || obj.nodeName == 'BODY')
    break;
    }
    if (obj.nodeName == 'A' && obj.href != '') {
    objActive = obj;
    act = 1;
    clrOrg = obj.style.color;
    TimerID = setInterval("ChangeColor()",100);
    }
    }
    }
    function Mozilla_stopRainbowAnchor(e)
    {
    if (act) {
    if (objActive.nodeName == 'A') {
    objActive.style.color = clrOrg;
    clearInterval(TimerID);
    act = 0;
    }
    }
    }
    function ChangeColor()
    {
    objActive.style.color = makeColor();
    }
    function makeColor()
    {
    // Don't you think Color Gamut to look like Rainbow?
    // HSVtoRGB
    if (elmS == 0) {
    elmR = elmV;    elmG = elmV;    elmB = elmV;
    }
    else {
    t1 = elmV;
    t2 = (255 - elmS) * elmV / 255;
    t3 = elmH % 60;
    t3 = (t1 - t2) * t3 / 60;
    if (elmH < 60) {
    elmR = t1;  elmB = t2;  elmG = t2 + t3;
    }
    else if (elmH < 120) {
    elmG = t1;  elmB = t2;  elmR = t1 - t3;
    }
    else if (elmH < 180) {
    elmG = t1;  elmR = t2;  elmB = t2 + t3;
    }
    else if (elmH < 240) {
    elmB = t1;  elmR = t2;  elmG = t1 - t3;
    }
    else if (elmH < 300) {
    elmB = t1;  elmG = t2;  elmR = t2 + t3;
    }
    else if (elmH < 360) {
    elmR = t1;  elmG = t2;  elmB = t1 - t3;
    }
    else {
    elmR = 0;   elmG = 0;   elmB = 0;
    }
    }
    elmR = Math.floor(elmR).toString(16);
    elmG = Math.floor(elmG).toString(16);
    elmB = Math.floor(elmB).toString(16);
    if (elmR.length == 1)    elmR = "0" + elmR;
    if (elmG.length == 1)    elmG = "0" + elmG;
    if (elmB.length == 1)    elmB = "0" + elmB;
    elmH = elmH + rate;
    if (elmH >= 360)
    elmH = 0;
    return '#' + elmR + elmG + elmB;
    }
    //]]>
    </script>
    • Save It and Enjoy. . . !

    I think you enjoyed this post.Surely you will get excited after using this widget.